This article contains complete operating instructions for UAD Console, your software for controlling Volt 876.
Note: If you're controlling an Apollo audio interface, see the UAD Console for Apollo manual.
In This Article
- Introducing UAD Console for Volt 876
- Overview of UAD Console for Volt 876
- UAD Console for Volt 876 Layout
- Inputs in UAD Console for Volt 876
- Monitor Mix Controls
- Monitor Column
- Control Room
- Cues
- USB and ADAT Mode
- ADAT expansion with multiple Volt 876 interfaces
- ADAT Expansion with Other Digital Gear
- UAD Console for Volt 876 Settings
Introducing UAD Console for Volt 876
UAD Console for 876 is powerful companion software for your Volt 876 audio interface that provides full remote control of all hardware functions, right from your computer. You can also create a latency-free main monitor mix and two additional cue mixes for performers, control a loopback channel for software inputs, use the talkback mic, and much more.
UAD Console for Volt 876 lets you:
- Adjust preamp settings for all analog inputs (gain, Vintage mode, 76 Compressor, Polarity, and +48V phantom power)
- Adjust preamp gain automatically with Assistive Auto-Gain
- Enable instrument (Hi-Z) levels on analog inputs 1 & 2
- Adjust monitor and cue mixes from the analog, digital, and loopback inputs
- Route two independent cue mixes to the headphone outputs and line or digital outputs
- Use Volt 876's built-in talkback mic to communicate with performers through cue mixes
- Control a stereo loopback (software playback) to monitor the output of other apps
- Control an expanded system for full mixing of 16 – 24 analog input channels with two or three Volt 876 units
- Save and load UAD Console session files for total recall of all relevant settings
- Configure Volt 876 as your primary audio interface, a standalone ADAT A/D - D/A converter with preamp control, or configure multiple Volt 876 units in an expanded system
About Volt 876 Documentation
- For UAD Console setup and descriptions, use this manual.
- For hardware configuration and descriptions, see the Volt 876 Hardware Manual.
- For registering your Volt in UA Connect and redeeming included software, see How to set up your Volt Interface.
Get UAD Console
To download and install the latest UAD Console app, and to update your Volt 876 firmware, use the UA Connect app. See this article for details.
Overview of UAD Console for Volt 876
UAD Console for Volt 876 is remote control software for your Volt 876 hardware, providing complete control of all hardware features, except headphone volumes and the power switch. It also functions as a mixer for combining analog and digital audio signals at your Volt 876 inputs for latency-free direct monitoring. Unlike UAD Console with Apollo, UAD Console for Volt 876 does not have any plug-in inserts or plug-in processing. All plug-in processing occurs in your DAW.
You can route your input signals to the main monitor mix, and send two independent cue mixes to designated outputs for performers. UAD Console for Volt 876 also controls the built-in talkback mic that you can use to communicate with performers through the cue mixes, and a loopback channel for including the output from other software, such as system sounds or video conferencing software, to your monitor and cue mixes.
With Volt 876, you can also record the outputs of UAD Console for Volt 876 (monitor mix, talkback mic, and loopback channel) into your DAW (digital audio workstation) software. Simply choose these "virtual" software outputs as the source for your DAW's input channel.
Hardware versus software monitoring
Direct hardware monitoring routes Volt 876 inputs directly to outputs for live monitoring, without being sent to the DAW first. Unlike software monitoring in your DAW, which has buffering latency, direct monitoring lets you hear your inputs without any latency.
UAD Console for Volt 876 does not mix signals that are software monitored in your DAW – for example, when you are playing through DAW plug-ins. When software monitoring, you must mute the input(s) in UAD Console, or disable Direct monitoring on the Volt 876 hardware, to prevent doubled signals.
Essential concept: Hardware monitoring (Direct) and software monitoring (Mute)Direct monitoring: Volt 876 inputs are unmuted and heard without latency. Input signals are still sent to the DAW so they can be recorded. Software monitoring: Volt 876 inputs are muted and heard from the DAW's mixer. Inputs can be processed with DAW plug-ins, but the monitored signals are subject to latency that depends on your buffer size setting. Important: When software monitoring, you must mute the input(s) in UAD Console, or disable Direct monitoring on the Volt 876 hardware, to prevent doubled "phasey" or "thin" audio. |
Modes overview
Volt 876 has two main operating modes, USB and ADAT. These two modes are completely different configurations of the Volt 876 inputs and outputs. The mode you need depends on how you use Volt 876. For details, see Mode.
USB mode – The standard audio interface mode, which allows you to route up to 24 analog and digital inputs into and out of your computer. USB mode is also the mode for the control unit in an ADAT expansion system.
ADAT mode – Reconfigures Volt 876 as a standalone mic preamp and A/D - D/A converter, or for use in an ADAT expansion system. In ADAT mode, digital audio is routed via optical cables, but the unit can be controlled by UAD Console for Volt 876 when connected to the computer via USB. ADAT mode has two possible states:
- ADAT standalone mode, with or without computer control via USB.
- ADAT expansion mode, when connecting two or three Volt 876's together as a multi-unit system. In this configuration, expander units are interconnected with optical cables, and up to 72 inputs are controlled via USB within a single, consolidated window in UAD Console for Volt 876.
UAD Console for Volt 876 Layout
UAD Console for Volt 876 always shows certain screen elements (the title bar, info bar, meter bridge, and input channel strips). You can show or hide other UAD Console elements to suit your workflow. The following illustration highlights some sections of the UAD Console for Volt 876 window.
Tip: UAD Console supports multiple levels of undo and redo. To undo a change in UAD Console, press Command+Z (Mac) or Alt+Z (Windows).
| # | Feature | Overview |
| 1 | Title bar | Includes the Device Name or Device Selector and Close, Minimize, and Maximize buttons. |
| 2 | Preamp controls | On analog inputs 1-8, allows you to configure the preamp settings. |
| 3 | Cue controls | Allows you to adjust the two independent cue mixes for Volt 876. |
| 4 | Meter bridge | Shows small level meters for all currently visible inputs. Drag left or right in the meter bridge to see any inputs that may be out of view. |
| 5 | Device Name or Selector | Select the device view for UAD Console here. You can select either Volt, Apollo, or Apollo E devices (if present). |
| 6 | Analog inputs | Analog inputs 1–8 are preamp inputs that can be connected to the outputs of analog equipment with ¼" or XLR connectors. |
| 7 | Digital inputs | Digital inputs are for mixing ADAT or S/PDIF signals from the outputs of other digital gear. |
| 8 | Loopback channel | The Loopback channel can be used to blend any audio routed to the system's "loopback" outputs into the mixer. |
| 9 | Control Room column | Lets you use the talkback mic on the front of the Volt 876 to address performers through Cue mixes, and to choose which source to monitor. |
| 10 | Monitor column | Lets you configure which inputs to show in UAD Console, configure cue sources, and control the main mix level to your monitor speakers. |
| 11 | Info bar | Lets you choose the Volt 876 operating mode, sample rate, and clock source. |
| 12 | Options column | Includes large and small switches for each Cues row, and the Clear Solo (S) and Clear Over Limit (OL) switches. Clear Solo allows you to toggle Solo on/off for any soloed channels. Clear OL clears any clipped meter LEDs in UAD Console. |
Title Bar
The Title Bar is the topmost strip in the UAD Console window, as shown below.
UAD Console Title Bar
Volt 876 (or your custom Volt device name, if entered in Settings) and the session name is displayed at the top of the title bar, in the Volt tab. Click a tab to switch to another device view, or use the key commands to navigate (Shift+Cmd+←/→ in macOS, Shift+Ctrl+←/→ on Windows).
If you have multiple Volt 876 devices connected and not yet configured as ADAT expander units, you can click this to open a menu and select a device to view.
The Title Bar includes Close, Minimize, and Maximize buttons. Click the “X” button to close the UAD Console window and quit UAD Console.
Meter Bridge
The meter bridge appears at the top of the UAD Console window. The Meter Bridge shows small level meters for all displayed inputs, even if not visible. The analog inputs are always visible. You can show or hide the two banks of digital inputs with the ADAT switches in the Monitor column.
Drag left or right in the meter bridge to see any inputs that may be out of view (if all channels are not already visible).
Meter Bridge Channel Meters
The vertical LED meters represent input signal activity for each displayed channel. These small meters mirror the activity of the high-resolution input meters that are displayed next to each channel’s input fader.
Signal flow overview
The following illustration shows how signals move through an input channel strip in UAD Console.
| # | Feature | Overview |
| 1 | Vintage preamp mode | Applies analog vintage preamp processing to the input signal (analog inputs only) |
| 2 | 76 Compressor | Compresses the input signal with adjustable analog compression (analog inputs only) |
| 3 | Gain | Sets the signal level manually (analog inputs only) |
| 4 | Assistive Auto-Gain | Sets the signal level automatically (analog inputs only) |
| 5 | 48V phantom power and polarity | Enables/disables phantom power and reverses polarity (analog inputs only) |
| 6 | Cues | All inputs can be routed to up to two cue buses, letting you create separate individual mixes for performers with levels tailored to their needs. Cues can be routed to headphone outputs, and mirrored to line outputs. |
| 7 | Pan | All inputs can be panned to the right or left in the stereo field. |
| 8 | Solo and Mute | You can solo one or more inputs to temporarily hear individual sources alone. You can mute one or more inputs to temporarily remove them from the mix. |
| 9 | Fader | You can adjust the fader for an input to set the level of the source in the mix. The fader does not affect the input level of a track (the level that is received by your DAW software). |
| 10 | Out to Main Mix | All inputs are routed to the main mix, which you can listen to on speakers connected to the Monitor outputs or headphones connected to headphone outputs 1 & 2 (if not used for cues). |
Info Bar
The Info Bar is where you can access commonly adjusted settings.
Mode
Sets the operating mode for Volt 876. See USB mode and ADAT mode for complete details.
Sample Rate
This displays the current sample rate for A/D and D/A conversion. Select a different sample rate from this drop menu. The number of available ADAT channels changes at higher sample rates (88.2 kHz or higher).
Available sample rates (kHz)
- 44.1
- 48
- 88.2
- 96
- 176.4
- 192
Clock Source
The active clock source (Internal, ADAT, S/PDIF, or Word Clock) is displayed here. You can select a different clock source from this drop menu. The clock source flashes red if the currently selected clock is unresolved (when digital audio is not synchronized).
- Internal: The clock source is Volt 876's internal clock.
- Word Clock: The clock source is from an external clock connected to the word clock input on Volt 876.
- ADAT: The clock source is from an incoming ADAT signal. ADAT is only available when the digital input format is ADAT in UAD Console settings, or the unit is in ADAT mode.
- S/PDIF: The clock source is from an incoming S/PDIF signal. S/PDIF is only available when the digital input format is S/PDIF in UAD Console settings.
Important: When the Clock Source parameter is set to use any external clock source, the sample rate must be manually set to match the sample rate of the external clock.
Inputs in UAD Console for Volt 876
The following input channel types are available on Volt 876 in UAD Console.
Volt 876 analog inputs
All analog inputs have preamps and accept audio from analog sources such as a microphone, guitar or bass instruments, or the analog outputs from line-level equipment such as keyboards. There are two analog connector types available for each analog input 1–8.
- XLR connectors – When an XLR plug is connected to a jack, all preamp features are available except for the INST (Hi-Z) setting on channels 1–2.
- ¼" connectors – When a ¼" TRS or TS plug is connected to a jack, all preamp settings are available except for 48V phantom power, which is only available on XLR connections.
- Hi-Z connectors– When a ¼" plug is connected to analog inputs 1–2, these inputs can be set to accept Hi-Z instrument signals by engaging the INST switch on the hardware or in UAD Console. 48V phantom power is disabled when the INST button is lit.
Analog preamp quick reference
| # | Feature | Overview |
| 1 | Vintage preamp mode | Enable Vintage preamp mode to add classic analog preamp tone to your signal. Vintage preamp tone is recorded in your DAW software. |
| 2 | 76 Compressor | Enable the 76 compressor to provide analog 1176-style compression to the input signal. 76 compression is recorded in your DAW software. |
| 3 | Instrument switch | Sets input 1 or 2 to accept instrument (Hi-Z) input. |
| 4 | Gain knob | Manually set the level for the incoming signal with the Gain knob. This adjusts the signal level to your DAW software. |
| 5 | Assistive Auto-Gain | Adjust the input level for one or more channels automatically using Assistive Auto-Gain.This sets the level to your DAW software. |
| 6 | 48V phantom power switch | Apply 48V phantom power when required for microphones. |
| 7 | Polarity switch | Reverse the polarity of the channel to correct for phase problems. |
Volt 876 analog input details
Vintage preamp mode
Vintage preamp mode adds a carefully crafted analog tube preamp emulation, inspired by Universal Audio’s all-tube 610 console preamplifier, for a richer sound. When the button is lit orange, the circuit is active.
Press the Vintage switches to toggle Vintage preamp mode. Vintage preamp mode can be used on mic, line, and instrument inputs. When enabled, the Vintage button is lit in UAD Console and on the Volt 876 hardware for the input.
76 compressor
To enable or disable a 76 comp preset, click the preset name, or press the 76 Comp button to toggle the 76 compressor circuit on/off. The 76 compressors can be used on mic, line, and instrument inputs. The button is lit orange when the compression circuit is active.
The 76 Compressor lets you add clarity and punch to voice, guitars, and more, with an analog compressor based on UA's iconic 1176 Limiting Amplifier.
Tip: The input level increases when the compressor is active, so you may want to readjust your Gain setting.
76 Compressor Presets
The indicators below the 76 Comp button indicate whether the compressor is off or enabled with one of the presets. The 76 Comp presets have the following characteristics:
| FAST | Fastest attack and fast release for aggressive compression |
| GUITAR | Medium attack and very slow release allows guitar/bass transients and longer sustain |
| VOCAL | Slowest attack and slow release for classic smooth vocal compression |
Tip: Although these presets are designed to work well with these particular sources, you can use any setting with any source. Feel free to use the 76 Comp creatively.
Instrument switch (channels 1–2 only)
Press the INST switch to toggle the impedance and gain of the ¼" input to accommodate a Hi-Z instrument, such as an electric guitar or bass.
Gain knob
You can manually adjust the gain for an input channel with the gain knob in UAD Console, or you can use the encoder on the left side of the Volt 876 hardware. In UAD Console, drag the knob to adjust the level. Adjust the level so your loudest sources do not peak in the red on the UAD Console input strip meter.
Assistive Auto-Gain
You can set the preamp's input gain automatically with Assistive Auto-Gain.
CAUTION: Assistive Auto-Gain automatically adjusts preamp levels for recording. To avoid damage to your hearing, confirm your monitor levels are set safely before proceeding.
To set gain automatically
- On any preamp channel, press the Auto-Gain button under the gain knob. The Auto-Gain floating window opens.
- Press Start, and play your source as loudly as you will play during the performance. The gain is set automatically.
By default, Assistive Auto-Gain detects and adjusts levels for 10 seconds. To increase or decrease the duration by ±5 seconds, press the -5 or +5 buttons. You can adjust the duration while Auto-Gain is listening.
The Auto-Gain floating window closes after the listening duration completes. To close the Auto-Gain window, click Done.
Note: When using Auto-Gain with stereo linked inputs, the same gain amount is applied to both inputs. Auto-Gain sets the level based on the peak from the loudest input.
Tip: You can set Auto-Gain on multiple preamps simultaneously. Simply click the Auto-Gain button for each preamp you want to adjust. The Auto-Gain options in the floating window apply to all Auto-Gain-enabled preamps.
Auto-Gain settings
Click SHOW MORE to see more settings for Auto-Gain.
| Feature | Details |
| Duration |
Sets the amount of time that Auto-Gain listens while setting gain levels. The default setting is 10 seconds. To set a different duration, click and drag up or down in the box, or click the -5 or +5 buttons. You can also click in the box and type a new value, then press Enter. Note: The maximum duration is 90 seconds. |
|
Apply Gain
|
Sets the Auto-Gain adjustment behavior. WHILE LISTENING applies gain changes every two seconds for the Auto-Gain duration. You can only use WHILE LISTENING with one or two preamps enabled for Auto-Gain. AFTER LISTENING applies the gain change after the Auto-Gain listening duration is complete. |
| Listening Threshold | Determines the lowest level at which Auto-Gain detects a signal and begins adjusting gain. This setting ensures that Auto-Gain doesn’t set very loud gains when no detectable signal is available. The default setting is -50 dBFS, which may be too quiet for low level sources. To set a different threshold, click and drag up or down in the box, or click in the box and type a new value, then press Enter. |
|
Peak Target
|
Determines the maximum peak level that Auto-Gain should set for your material. The default setting is -8 dBFS, but you can adjust it higher or lower. Be aware that higher settings (less headroom) increase the risk of digital clipping. To set a different peak target, click and drag up or down in the box, or click in the box and type a new value, then press Enter. |
48V phantom power
If you are using equipment that requires phantom power, such as a condenser microphone, engage the 48V switch on the channel. When 48v phantom power is enabled, the 48V LED is lit red in UAD Console and on the Volt 876 hardware for the channel. The 48V LED blinks briefly when enabling or disabling phantom power. Do not connect or disconnect equipment from the input when 48V phantom power is enabled, or when the LED is blinking.
Caution: Activate 48V only with compatible equipment such as phantom powered microphones. Incompatible equipment could be damaged by the applied voltage.
Polarity
Enable the polarity (phase) switch to invert the channel's signal polarity. When enabled, the switch is lit in UAD Console and on the Volt 876 hardware for the selected channel.
Tip: Invert polarity to reduce phase cancellations when more than one microphone is used to record a single source.
Volt 876 digital input details
The digital inputs route digital signals (ADAT or S/PDIF) into the mixer. With UAD Console, you can route the digital inputs to cues. With your DAW, you can route the digital inputs to any Volt 876 outputs.
Unlike analog inputs, there are no tone-shaping features or preamp controls for digital channels. Signal levels for the digital inputs are set by adjusting the output levels of the digital gear connected to Volt 876.
To choose the digital channel format, see UAD Console for Volt 876 Settings.
Toggle ADAT channel visibility
Volt 876's ADAT channels can be shown or hidden in UAD Console. To toggle ADAT channel visibility, click the buttons below Cues in the Monitor strip. These buttons are labeled with the channels that will be shown/hidden when toggled. When a button is lit those channels are shown in UAD Console. The number of available channels is updated if you change the sample rate.
Note that the visibility of an input does not mute or unmute audio. Use the Mute switch to mute a digital channel. If S/PDIF digital format is specified, those channels are always displayed and the buttons for ADAT channels do not appear.
ADAT
With ADAT inputs, up to 16 ADAT input channels are available in the UAD Console mixer, depending on the digital format and sample rate.
S/PDIF
With S/PDIF inputs, two input channels and two output channels are available, regardless of the sample rate. S/PDIF output channels are mirrored on the two optical outputs.
Digital audio channels and sample rates
A simple overview of the available digital audio channels at different sample rates is provided in the table below.
| Optical Format | Sample Rate (kHz) | Optical IN 1 | Optical OUT 1 | Optical IN 2 | Optical OUT 2 |
| S/PDIF | 44.1, 48 |
Two channels S/PDIF L/R |
Two channels S/PDIF L/R |
Disabled |
Two channels S/PDIF L/R (mirrored) |
| 88.2, 96 | |||||
| 176.4, 192 | |||||
| ADAT | 44.1, 48 |
Eight channels ADAT 1–8 |
Eight channels ADAT 1–8 |
Eight channels ADAT 9–16 |
Eight channels ADAT 9–16 |
| 88.2, 96 (S/MUX) |
Four channels ADAT 1–4 |
Four channels ADAT 1–4 |
Four channels ADAT 5–8 |
Four channels ADAT 5–8 |
|
| 176.4, 192 (S/MUX) |
Two channels ADAT 1–2 |
Two channels ADAT 1–2 |
Two channels ADAT 3–4 |
Two channels ADAT 3–4 |
Volt 876 loopback channel
The loopback (software playback) channel routes system audio into your UAD Console mixer. With this channel you can incorporate audio from audio apps, videos, games, or other system events into your audio production stream.
Typical loopback uses:
- Recording system audio – Capture music, podcasts, or video sound directly from your computer without a microphone
- Live streaming – Play background music or sound effects for your audience while live streaming
- Virtual meetings – Share audio clips or a song with others during a virtual meeting or a video conference call
- Capturing game audio – Record in-game sounds cleanly, without picking up keyboard noise or other room sounds
To route audio into the loopback channel, select LOOPBACK as the output device in your audio software's advanced settings. Note that not all software has this capability.
Monitor Mix Controls
Monitor mix are the controls in UAD Console that allow you to mix audio signals that appear in monitor outputs 1-2 (and Alt outputs 3-4, when configured). Monitor mix controls appear slightly differently for mono and stereo linked tracks.
Tip: You can toggle compact faders (making them shorter) by clicking the top edge of the fader area. Alternatively, choose View > Compact Monitor Faders from the UAD Console menus to toggle fader height.
| # | Feature | Description |
| 1 | Input pan | Moves the track left and right in the stereo panorama. Stereo linked inputs include left and right pan controls. |
| 2 | Input solo | Only this input is heard in the monitor mix. Multiple inputs can be soloed at the same time. |
| 3 | Input mute |
Input is not heard in the monitor mix. Multiple inputs can be muted at the same time. Note that to monitor an input only through your DAW (software monitoring), you must mute the input. When not muted, direct monitoring is enabled on the input. |
| 4 | Input fader | Adjusts the level of the input in the monitor mix. The input fader does not affect the level sent to the DAW. |
| 5 | Input level meter | Displays the input signal level. The input fader does not change the meter level. To change the meter level, adjust the input's preamp gain (analog inputs only). |
| 6 | Input fader value | Displays the level in dB of the fader. Click to enter a specific value. |
| 7 | Channel name | Displays the input name. Click to rename the input, and to link or unlink stereo inputs. |
Renaming and linking inputs
Click on the name of an input at the bottom of the channel strip to open the rename / link popover.
| # | Feature | Description |
| 1 | Input name | You can enter a custom name here. To restore the original name, clear the entry the close the popover |
| 2 | Link button | Click this button to link or unlink a stereo pair. When the link button is lit, the track is linked. Stereo pairs must begin with an odd-numbered input (you can link input 5 & 6, but not 6 & 7). |
| 3 | Previous / Next | Click the arrows to cycle through the previous and next inputs. |
Monitor Column
The Monitor Column contains elements related to monitor outputs, fader display, and cues. The Monitor Column is visible at the right side of the UAD Console window, when View > Section > Monitor is selected from the UAD Console menus.
| # | Feature | Description |
| 1 | Stereo level meters |
Display the levels of the monitor mix. Levels displayed here mirror the Monitor 1–2 LED meters on the Volt 876 hardware. These meters show the signals before the monitor output level control (pre-fader) and reflect the level of the D/A converters at the monitor outputs. Important: If clipping occurs, reduce levels feeding the monitor mix by lowering channel faders. |
| 2 | Show: Loopback | Toggles display of the Loopback channel. See Volt 876 Loopback channel for details. |
| 3 | Show: Cues | Opens the Cue Outputs popover, where cue mixes are assigned. See Cues for details. |
| 4 | Show: ADAT inputs | Toggles visibility of the ADAT inputs (if ADAT digital inputs are enabled in UAD Console Settings). |
| 5 | Show: Settings | Shows the Settings window, where you can configure Volt 876 hardware settings. |
| 6 | Monitor output: Monitor switch | When lit, the monitor mix is heard in the monitor (1–2) outputs. This button is visible only when ALT monitoring is enabled. |
| 7 | Monitor output: Alt switch | When lit, the monitor mix is heard in the Alt (3–4) outputs. This button is visible only when ALT monitoring is enabled. |
| 8 | Monitor output: Mono switch | Sums the left and right channels of the stereo monitor mix into a mono signal. The monitor output is mono when the button is lit. |
| 9 | Monitor level knob | This is the master level control for Volt's monitor outputs. It mirrors the monitor level knob on the Volt 876 hardware. |
| 10 | Show: Control Room switch | Toggles display of the Control room column, where you enable talkback, adjust talkback sends, and select which mix is heard at the monitor outputs. |
| 11 | Monitor output: Mute switch | Mutes/unmutes the monitor 1–2 outputs. Headphone outputs are not muted. |
| 12 | Session File | Displays the current session file name. Click here to open the session browser to save or load a Volt 876 UAD Console session. See Session Files for more information. |
Output section details
Monitor options are controlled with the switches in the Output section.
By default, only Mono and Mute switches are displayed. When Alt monitoring is enabled, the Monitor and Alt switches are displayed.
Output section with Alt disabled (left) and Alt enabled (right)
Alt monitoring
Volt 876 features the ability to monitor an alternate set of speakers, for quickly comparing how a mix sounds through a different set of speakers. You can enable Alt monitoring in UAD Console software, or from your Volt 876 hardware front panel.
Alt monitor outputs
When Alt monitoring is enabled, you hear the alt mix on analog outputs 3–4. Connect your alternate speakers to those outputs for Alt monitoring.
When Alt monitoring is enabled, any signals that were previously heard on outputs 3–4 are no longer heard on those output. For example, if a Cue mix is mirrored to outputs 3–4, that connection is removed. When Alt monitoring is disabled, signals previously heard on outputs 3–4 are restored.
To enable Alt monitoring in UAD Console:
- Click Settings in the Monitor column on the right side of the UAD Console window, or choose UAD Console > Settings from the UAD Console menus.
- Set the Alt Count to 1.
- To disable Alt monitoring, set Alt Count to 0.
To enable Alt monitoring on Volt 876 hardware:
- On the Volt 876 front panel, press and hold the ALT button until the button flashes (approximately 2 seconds).
Volt 876 is now in Alt Monitor mode and any signals that were routed to outputs 3–4 are no longer routed to those outputs. - When in Alt Monitor mode, press the ALT button once to toggle signal to the Alt outputs. When the ALT button is lit, the main mix is now routed to outputs 3–4 instead of the Monitor L/R outputs. When the button is unlit (toggled off) the main mix is again routed to the Monitor L/R outputs, and no signal is sent to outputs 3-4.
- To exit ALT mode from the Volt 876 hardware, press and hold the ALT button again until the button flashes (approximately 2 seconds). Any channels previously routed to outputs 3-4 are now restored.
Monitor / Alt switches
The Monitor and Alt switches send the mix to either the Monitor outputs or the Alt outputs. These switches are only available when Alt monitoring is enabled.
Mono
This switch sums the left and right channels of the stereo monitor mix into a monophonic signal. The mix is mono when the button is lit.
Mute
This switch mutes the monitor outputs. The monitor outputs are muted when the switch is lit. The Monitor Level Indicator (the ring around the level knob) in UAD Console and on the Volt 876 hardware is red when the monitor outputs are muted.
Level
This is the master level control for monitor outputs. It performs the same function as the MONITOR hardware knob. When the ring around the knob is RED, the monitor outputs are muted.
Adjusting and muting Monitor Level on macOS
You can use function keys to adjust Volt's monitor level and mute. The key combinations depend on a macOS setting.
Check this macOS setting:
MacOS System Settings > Keyboard > Keyboard Shortcuts > Function Keys > Use F1, F2, etc. keys as standard function keys
If this setting is enabled:
- Fn + F10: Mac mute
- Fn + F11: Mac volume down
- Fn + F12: Mac volume up
- Cmd + F10: Volt monitor mute
- Cmd + F11: Volt monitor volume down
- Cmd + F12: Volt monitor volume up
If this setting is disabled:
- F10: Mac mute
- F11: Mac volume down
- F12: Mac volume up
- Cmd + Fn + F10: Volt monitor volume mute
- Cmd + Fn + F11: Volt monitor volume down
- Cmd + Fn + F12: Volt monitor volume up
Session Files
You can manage your Volt 876 UAD Console configurations with session files. A session file saves your current session settings to disk. You can load a session file to restore UAD Console to a previously saved state.
Note: Monitor settings and hardware settings are global parameters that are not saved in session files.
The specific parameters saved in Volt 876 UAD Console session files are listed below:
| Saved in Volt 876 session file | Not saved in Volt 876 session file |
|
Analog preamp settings (Vintage, 76 Comp, Inst switch, Gain, 48V, Polarity) All knob, mute/solo, and fader values (pans, cues, levels) Channel mute state Input stereo link state Loopback channel level |
Input names Monitor level Clock source Sample rate Cue output settings |
Session File Location
By default, session files are stored in:
- Mac: Users/[UserName]/Documents/Universal Audio/Volt Sessions/
- Windows: C:\Users\[UserName]\AppData\Roaming\Universal Audio\Volt Sessions
Session files can be stored anywhere on disk, but using the default location is recommended, because UAD Console always uses this location for the Session Browser and Open/Save dialogs presented by the computer's operating system.
Note: Session files must reside in the default location to appear in the Session Browser within UAD Console.
Session Files Suffix
Volt 876 session files have the ".volt876" suffix. The suffix is added to session files automatically when saving to disk; however, the suffix is not displayed in the file save dialog (the suffix should not be manually typed when saving a session file).
To save and load sessions
- Click the session name at the bottom of the Monitor Column to open the Session Browser at the left of the UAD Console window.
- To load a session, click the session name.
Note: A warning appears if the session you are loading requires +48V phantom power to be enabled on one or more input. To load the session and enable +48V phantom power, you must click OK. Otherwise, click Cancel. - To save the current session, click Save, type the name (or leave it as is), and click Save.
- To rename a selected session, click Rename, type the new name and click Rename.
- To delete a selected session, click Delete, then click Delete again.
The Session Browser
Control Room
The Control Room column can be accessed by clicking CTRL ROOM on the Show section of the Monitor column. The Control Room controls allow you to activate the Talkback mic and adjust talkback levels to the Cues, and select the source that is heard at the monitor 1–2 outputs.
| # | Feature | Overview |
| 1 | Talkback controls | These knobs control the talkback mic levels heard in Cues 1 & 2. The mute switches prevent talkback mic from being heard in the cues. |
| 2 | Dim / Talk switch | Activates the talkback mic and the Dim function. Talkback is active when the button is lit, and the monitor level is reduced to prevent feedback. |
| 3 | Source | Selects which mix bus is heard at the monitor outputs. You can choose either Monitor, Cue 1, or Cue 2. |
Talkback
Talkback is activated using the dedicated hardware TALK button on Volt 876, or the DIM / TALK button within the UAD Console Control Room strip.
Dim / Talk switch
- Continuous (latched) talkback – Press the switch once to latch or unlatch talkback. When latched (lit), the talkback mic signal is sent to the monitors and cues.
- Momentary (unlatched) talkback – Press and hold for momentary talkback. The talkback mic sends signal while the button is held and stops sending signal when the button is released.
Talkback microphone
The talkback microphone is sensitive. To avoid equipment damage, do not insert any object into the mic hole, apply pressurized air into the mic hole, or use a vacuum over the mic hole.
Dimming
When talkback is active, monitor output is lowered (dimmed) by 20 dB to allow the talkback mic to better capture the voice input instead of program material from the monitor speakers.
Talkback to Cues
When talkback is active (the button is latched or held), the talkback mic signal is sent to the two Cues. You can control the level of talkback signal to each Cue with the knobs on the Control Room strip, and mute the talkback signal to a Cue by pressing the mute switch.
Source
Enable a Source button to select which mix is heard at the monitor or Alt outputs. You can choose either Monitor, Cue 1, or Cue 2.
- To hear the main mix, choose Monitor.
- To hear a Cue mix, choose Cue 1 or Cue 2. Note that if a Cue is set to Mix in the Cue Outputs popover, you cannot set the monitor source to that Cue, because the main mix is the default setting. A dialog with instructions appears if you try to monitor a Cue that is set to Mix.
Cues
You can use cues to create mixes that are different from the main monitor mix. Cues are typically used for performers that want to hear a custom mix in headphones.
The cue mixes can also be sent (mirrored) to an available pair of outputs.
Note: In an expanded system, mirroring to an ADAT output pair effectively sends the cue mix to the expander unit's corresponding analog outputs. For example, routing to ADAT 3-4 on an expanded system sends audio to analog outputs 3–4 on the first expander unit.
In the image below, Cue 2 is mirrored to Line 5-6. Signals routed to Cue 2 (Headphone 2) are also duplicated to Line outputs 5-6, which can then be used to send the Cue mix out to another monitoring device.
The cue mixes are adjusted using the two cue sends on each input strip and on the Loopback strip. All cue sends are pre-fader and pre-mute so they are not affected by adjustments to the main monitor mix, but do include Vintage and 76 compressor signals (analog inputs only).
How do I listen to Cues?
Cues are assigned in the Cue Outputs popover, where you assign Cue mixes or the main mix to headphones, and optionally to other outputs.
By default, the headphones receive the main mix. To hear the cue mixes in the headphones, disable the MIX button in the Cue Outputs popover.
Cue popover options
To open the Cue outputs popover, click Cues in the Monitor column.
| # | Feature | Description |
| 1 | Devices column | Shows the units that have assignable Cue mixes, and their headphone outputs. If there are multiple Volt 876 units, each has a different letter designation (A, B, or C). |
| 2 | Cue 1 routing column | Sets the audio source for Cue 1 (Headphone 1). |
| 3 | Cue 2 routing column | Sets the audio source for Cue 2 (Headphone 2). |
| 4 | MIX button | Deselect to enable the Cue mix in headphones. The main monitor mix is heard in the headphones when the MIX button is lit, and the Cue mix is heard when the MIX button is unlit. |
| 5 | Mirror To menu | You can mirror the main mix or a cue output to an output channel pair. Click to select an output pair from the drop menu. |
| 6 | Cue Routings | The current cue routings are shown in the blue boxes. In this example, the main mix is routed to Headphone out 1, and the Cue 2 mix is routed to Headphone out 2. |
Large and Small Cues
By default, cues are shown in Small view, which includes a level knob and mute switch. You can expand Cues to reveal the pan control for the cue, and to use a long-throw fader for more accurate level control.
To expand a cue row, click the Large icon to the left of the row.
Adjusting Cue Levels
To adjust the level of the input sent to the cue mix, rotate the Cue knob. The cue level is shown while you engage the knob.
You can enter a level by double-clicking the Cue knob to open the Cue volume popover, then type a dB value (-144 to +12), and click OK.
When Cues are in Large view, drag the fader to adjust the cue level, or click the level value at the bottom of the meter to open the cue volume popover and type the level. You can also adjust the pan control in this view.
USB and ADAT Mode
From this drop menu you can switch between USB interface mode and ADAT mode. The two modes are completely different configurations of Volt 876 inputs and outputs. USB mode is the standard audio interface mode, which allows you to route up to 24 analog and digital inputs through your interface. ADAT mode reconfigures the unit as a standalone mic preamp and A/D - D/A converter, or for use in an ADAT expansion system.
Note: To switch modes using the Volt 876 hardware front panel, a specific procedure is required. See the Volt 876 Hardware Manual.
Active MIDI ports
On any Volt 876 that is connected via USB, the MIDI ports remain active. This includes both USB and ADAT modes, in any configuration.
Note: On macOS, Volt 876 appears as two different MIDI devices depending on whether the unit is in USB mode or ADAT mode. When configuring the device in Audio MIDI Setup, make sure to use the Volt 876 device that is currently active. To distinguish between the devices in Audio MIDI Setup, you can double-click each Volt 876 MIDI device and give it a unique name.
USB mode
USB mode is the default configuration for Volt 876. In USB mode, analog inputs and digital outputs are unlinked, and can be routed independently using UAD Console and/or your DAW. USB mode is also the mode for the control unit in an ADAT expansion system.
USB interface mode sample rates and I/O
| Sample Rate (kHz) | Analog I/O | ADAT Digital I/O |
| 44.1, 48 | 8 x 8 | 16 x 16 |
| 88.2, 96 | 8 x 8 | 8 x 8 |
| 176.4, 192 | 8 x 8 | 4 x 4 |
Volt 876 in USB interface mode
ADAT mode
ADAT mode has two possible states:
- ADAT standalone mode
- ADAT expansion mode
ADAT standalone mode
ADAT standalone mode is the default mode when you switch a Volt 876 unit to ADAT mode. In this mode:
- Volt 876 functions as a standalone mic preamp and A/D - D/A converter
- Analog inputs 1-8 are routed directly to corresponding ADAT outputs 1-8
- ADAT inputs 1-8 are routed directly to corresponding analog outputs 1-8
- Audio is not routed to the computer (there is no audio in UAD Console)
- Volt 876 does not appear as a Core Audio or ASIO device
- Loopback is disabled
ADAT standalone mode with computer control
In ADAT standalone mode, when Volt 876 is connected to your computer via USB, the following settings can be controlled within UAD Console:
- Preamp settings
- Sample rate
- Clock source
- USB or ADAT mode
Volt 876 in ADAT standalone mode in UAD Console
ADAT expansion mode
In ADAT mode you can configure the Volt 876 as an expander unit. In this mode, two or three Volt 876 units can be combined to provide control within UAD Console of up to 24 preamp inputs. See ADAT expansion with multiple Volt 876 interfaces for more information.
ADAT Expansion with Multiple Volt 876 Interfaces
You can expand your Volt 876 system to include two or three Volt 876 interfaces for 16 or 24 analog inputs (at 44.1 kHz and 48 kHz). In this configuration, one Volt 876 is set as the USB interface unit, and the other Volt 876 units are set as ADAT expander units.
Important: ADAT expansion mode requires two or more Volt 876 units connected to your computer via USB and to each other via optical cables. ADAT expansion mode also requires the UAD Console app. ADAT expansion mode cannot be configured using Volt 876 hardware buttons.
In this configuration, the ADAT outputs from the ADAT expander units are connected to the ADAT inputs on the USB interface unit, and vice versa.
Each Volt 876 must also be connected separately to the host computer via USB. You can then control all analog preamp settings for the ADAT expander units within UAD Console, and all audio from the expander units is available in the UAD console monitor and cue mixes.
Caution: To prevent feedback, before you switch a device between USB mode and ADAT mode, make sure all microphones are muted.
ADAT Expansion and sample rates
For sample rates higher than 48 kHz, the maximum number of expander channels is eight, and only one expander unit is supported.
| Sample rate | Available preamp channels | Expander units |
| 44.1 kHz / 48 kHz |
8 (one expander unit) 16 (two expander units) |
One or two |
| 88.2 kHz / 96 kHz | 8 | One |
| 176.4 kHz / 192 kHz | 4 | One |
Cabling Volt 876 hardware for ADAT expansion (44.1 kHz / 48 kHz)
- Power off all Volt 876 hardware units.
- Connect the ADAT expander units to the USB interface unit via optical cables, as shown in the image and table below.
- Connect the USB interface unit and ADAT expander units to the computer via USB. You can use a USB hub to make these connections.
- After making the connections, power on the Volt 876 hardware units.
Optical & USB Connections for Volt 876 ADAT expansion (44.1 kHz / 48 kHz) 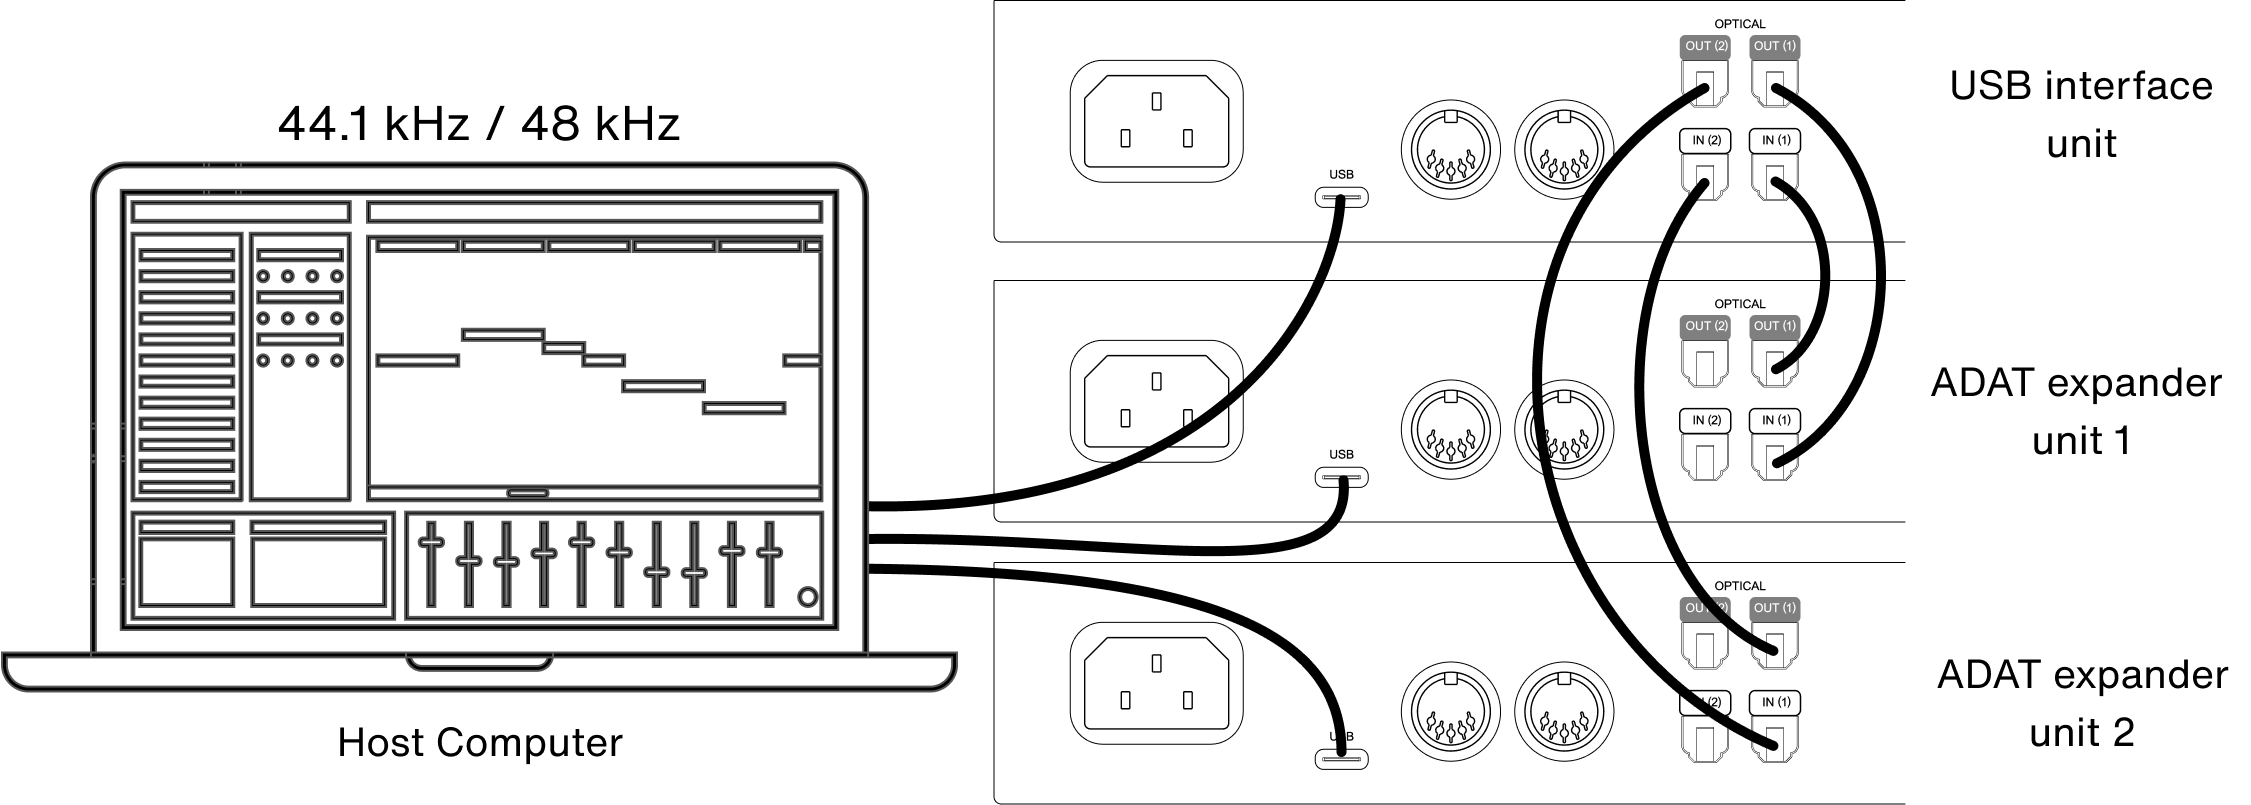
| USB interface unit | ADAT expander unit 1 | ADAT expander unit 2 |
| Optical In 1 | Optical Out 1 | |
| Optical In 2 | Optical Out 1 | |
| Optical Out 1 | Optical In 1 | |
| Optical Out 2 | Optical In 1 |
Cabling Volt 876 hardware for ADAT expansion (88.2 kHz – 192 kHz)
- Power off all Volt 876 hardware units.
- Connect the ADAT expander unit to the USB interface unit via optical cables, as shown in the image and table below.
- Connect the USB interface unit and ADAT expander unit to the computer via USB. You can use a USB hub to make these connections.
- After making the connections, power on the Volt 876 hardware units.
Optical & USB Connections for Volt 876 ADAT expansion (88.2 kHz – 192 kHz)
| USB interface unit | ADAT expander unit |
| Optical In 1 | Optical Out 1 |
| Optical In 2 | Optical Out 2 |
| Optical Out 1 | Optical In 1 |
| Optical Out 2 | Optical In 2 |
Configuring UAD Console for ADAT expansion
- Open UAD Console.
- Open UAD Console settings by clicking Settings in the Monitor column of the UAD Console window (right side), or choosing UAD Console > Settings from the UAD Console menus.
- From the Devices list, select the Volt 876 unit that you want to set as an ADAT expander unit, and select ADAT from its Mode menu. Repeat for the third unit (if applicable).
- From the Devices list, select the Volt 876 unit that is set to USB mode. This is the USB interface device that carries all computer audio I/O.
- From the ADAT 1-8 menu (44.1 kHz – 96 kHz), select the ADAT expander unit connected to Optical in 1 and optical out 1 on the Usb interface unit. This becomes ADAT expander unit 1.
At 176.4 kHz or 192 kHz the menu label is ADAT 1-4.
- If using three Volt 876 units, from the ADAT 9-16 menu, select the second ADAT expander unit.
- Set the Volt 876 unit clock sources.
Note: Settings shown are for 44.1 kHz and 48 kHz sample rate operation. At higher sample rates, labels and inputs appear differently. At 88.2 kHz and 96 kHz, only one expander unit can be selected, and the expander unit is listed as ADAT 1–8. At 176.4 kHz and 192 kHz, only one expander unit can be selected, and the expander unit is listed as ADAT 1–4.
UAD Console with Volt 876 ADAT expansion
After configuring Volt 876 ADAT expansion with one or two additional Volt 876 units, the preamps from the ADAT expander units appear in UAD Console. These inputs are adjustable from UAD Console or from the hardware, in addition to the inputs on the USB interface unit. All audio from the USB interface unit and the ADAT expander units is available in UAD Console.
Note: Linking ADAT inputs on ADAT expander units is not supported.
UAD Console with one Volt 876 showing 16 inputs (no expander unit)
UAD Console with one ADAT expander unit, showing 16 preamp inputs
ADAT Expansion with Other Digital Gear
You can expand your Volt 876 system to include one or two other ADAT or S/PDIF digital devices (including non-Volt interfaces), to expand your inputs to as many as 24 inputs (at 44.1 kHz and 48 kHz). In this configuration, you route the digital optical outputs of other devices into the Volt 876 digital optical inputs. The audio channels appear in UAD Console, routed through the ADAT channels.
- Input levels: There is no adjustment available in UAD Console for digital input levels from non-Volt devices. You must set the levels on your digital outboard gear.
- Clocking: If your gear is connected only from outputs to the inputs via the TOSLINK connections, the outboard gear must be the digital clock source, so you should set the clock source in UAD Console to ADAT.
Example connections for digital outboard gear with Volt 876
Cabling Volt 876 hardware for ADAT expansion with digital outboard gear
- Power off all hardware units.
- Connect the ADAT expander units to the Volt 876 via optical cables, as shown in the image above.
- Connect the Volt 876 interface to the computer via USB.
- After making the connections, power on all hardware units.
ADAT or S/PDIF inputs appear in UAD Console. You can assign these tracks to Cue mixes, and adjust monitor mix levels, solo, and mute. You cannot adjust input levels for external digital gear inputs. You must make those adjustments on the gear. ADAT or S/PDIF channel availability depends on the system sample rate. See Digital audio channels and sample rates for details.
UAD Console for Volt 876 Settings
To access settings in UAD Console for Volt 876:
- Click Settings in the Monitor column at the right side of the UAD Console window, or
- Choose UAD Console > Settings from the UAD Console menus.
| # | Feature | Description |
| 1 | Device Type | Select the Device type here (Apollo or Volt). This option is visible only if Apollo software is installed. |
| 2 | Device Name | You can rename your Volt 876 here. Type a name and press Enter to rename. |
| 3 | Identify | To identify the hardware, press Identify. This flashes all lights on the front of the hardware. Identify is especially helpful when multiple units are connected. |
| 4 | Mode | You can switch the unit between USB and ADAT modes here. |
| 5 | ADAT 1 | When combining two Volt 876 units, select the ADAT expander unit here. The expander unit must be set to ADAT mode. |
| 6 | ADAT 2 | When combining three Volt 876 units, select the second ADAT expander unit here. The second expander unit must be set to ADAT mode. |
| 7 | Digital Input | Choose ADAT or S/PDIF depending on the digital input format you want to use. |
| 8 | Digital Output | Choose ADAT or S/PDIF depending on the digital output format you want to use. |
| 9 | Alt Count | Choose 1 to define an ALT monitoring option on analog outputs 3–4. Note that this is the same as defining ALT outputs using the hardware ALT procedure. |
| 10 | Sample Rate | Sets the sample rate for the hardware. |
| 11 | Clock Source | Sets the digital clock source for the hardware. |
v260224