This article contains complete instructions for Volt 876 hardware controls and connections.
Note: To learn how to set up Volt with audio software and how to redeem your bundled software, please see How to set up your Volt Interface.
In This Article
- Quick Start
- Volt 876 Front Panel Descriptions (Left Side)
- Volt 876 Front Panel Descriptions (Right Side)
- Volt 876 Rear Panel Descriptions (Right Side)
- Volt 876 Rear Panel Descriptions (Left Side)
- Mode
- ADAT Expansion with Multiple Volt 876 Interfaces
- ADAT Expansion with Other Digital Gear
- Troubleshooting Volt 876
- Volt 876 Specifications
- Volt 876 USB Driver Channels
- Notices
Legendary Analog Sound for the Whole Band
Built by the same team behind the legendary Apollo, Volt 876 USB Recording Studio gives serious music producers a next-generation 32-bit / 192 kHz audio interface with eight onboard Vintage preamps and classic 1176-style compressors right on its front panel, providing big analog studio sound to every mic and instrument you connect.
Volt 876's integrated recording experience includes full recall of interface settings, mobile iPhone or iPad recording, iconic UAD plug-ins and instruments, and LUNA Digital Audio Workstation with smart AI-powered recording tools.
A Letter from Bill Putnam, Jr.
Thank you for choosing Volt 876 as part of your music making experience. We know that any new piece of gear requires an investment of time and money — and our goal is to make your investment pay off. Universal Audio’s family of audio interfaces represent the best examples of what UA has stood for over its long history; from its original founding in the 1950s by my father, to our current vision of delivering the best of both analog and digital audio technologies.
Volt 876 continues this tradition with legendary sound and flexibility for modern creators. With eight Vintage mic preamps, analog 76 compression, and professional 32-bit conversion, Volt 876 is built to handle everything from full bands to large productions — all with inspiring tone and craftsmanship.
You can also take advantage of powerful creative tools including session recall, cue mixes with talkback, and a full suite of award-winning UAD plug-ins and instruments. And when used with our LUNA recording software, Volt 876 lets you stay focused on making music with features like Auto-Gain, Voice Control, and unlimited tracks.
At UA, we’re dedicated to the idea that technology should serve the creative process — not be a barrier. These are the very ideals my father embodied as he invented audio equipment. We believe Volt 876 will earn its way into your creative workflow by providing stunning fidelity and rock-solid reliability for years to come.
Please feel free to reach out to us via our website www.uaudio.com, and via our social media channels.
We look forward to hearing from you, and thank you once again for choosing Universal Audio.
Bill Putnam, Jr.
Technical Overview
Volt 876 is a 24 x 28, 32-bit, 192 kHz USB 2.0 audio interface. Volt 876 includes eight best-in-class digitally-controlled preamps, with individually enabled Vintage mode, 76 Compressors, and Assistive Auto-Gain. In addition, Volt 876 includes up to 16 channels of ADAT digital I/O, or stereo S/PDIF digital I/O.
With advanced connectivity options, you can link up to three Volt 876 units for up to 24 analog preamps. For convenience in the studio, preamp settings and Volt features can be accessed with simple button presses from the front panel, or from within the UAD Console companion software. Dual stereo headphone outputs provide additional monitoring, while eight analog outputs can be configured for flexible cue monitoring or alternate monitors.
Key Features
- 24 input x 28 output USB 2.0 class-compliant audio interface
(driver required for maximum functionality on Windows, available in the UA Connect app) - Eight digitally-controlled analog preamps with individually-selectable Vintage modes, 76 Compressors, Assistive Auto-Gain, 48V phantom power, and polarity inversion
- Up to 16 ADAT or two S/PDIF digital audio I/O channels
- Dual headphone outputs with individual volume controls
- 32-bit, 192 kHz A/D and D/A conversion
- Link up to three Volt 876 units for 24 analog channels for recording
- Includes a curated collection of native UAD plug-ins
- ALT monitoring for listening on a different set of stereo speakers
- Remote control of all hardware functions (except headphone volumes and power switch) via UAD Console software
- Save and recall complete mixer settings in UAD Console
System Requirements
Mac & PC
- Available USB 2.0 (or higher) port
- USB cable (included)
- Intel, AMD, or Apple silicon processor
- Windows 10 64-bit edition or newer
- macOS Monterey 12 or newer
- Internet connection for software downloads
iPad & iPhone
- iPadOS / iOS 15 or later
Quick Start
About Volt 876 Documentation
- For hardware setup and descriptions, use this manual.
- For software configuration and descriptions, see the UAD Console for Volt 876 Manual.
- For registering your Volt in UA Connect and redeeming included software, see How to set up your Volt Interface.
Getting Started
To begin your setup, follow the steps below.
Hardware Installation
- Place Volt 876 on a flat surface (with included feet installed) or mount it in a standard 19" rack (with included rack ears).
- Connect Volt 876 to a USB 2.0 or higher USB port on your computer. Volt 876 includes a USB-C to USB-C cable with an attached USB-A adapter, for connection flexibility.
- Connect Volt 876 to a power outlet with the included IEC cable (Volt 876 cannot be bus powered).
Software Installation
- Download and install the UA Connect app from www.uaudio.com/volt/start
- Register your Volt hardware in UA Connect
- Download and install the UAD Console app from UA Connect
Note: For best performance on Windows systems, install the Volt 876 driver via UA Connect. Mac and iOS/iPad do not require a driver.
Mounting Hardware
Volt 876 includes rubber feet that can be attached to the bottom of the unit when you are placing the interface on a desktop or other flat surface. If you are installing in a standard 19" rack, mounting brackets are included that you can attach to the front edges of the unit.
Note: Do not attach the feet to the Volt 876 hardware if you are mounting it in a rack. Instead, attach only the rack mounting brackets.
Installing the feet
The rubber feet can be used when placing the unit on a desktop or other flat surface.
- In your Volt hardware package, locate the included feet and screws.
- Attach the feet to the bottom of the Volt 876 unit as indicated in the illustration.
Installing the rack mount brackets
Rack mount brackets can be used to mount the Volt 876 in a standard 19" rack. Rack mount screws are not included.
- In your Volt hardware package, locate the included rack ears and screws.
- Attach the screws to the left and right sides of the Volt 876 hardware unit as indicated in the illustration.
Audio Connections
You can make the following connections between your equipment and Volt 876.
| Connection | Details |
| Connect Hi-Z instruments such as guitars or basses directly to combo connector inputs 1–2 on the front of the device. You can also connect microphones or non Hi-Z sources here. | XLR/TRS Combo Inputs 1–2 |
| Connect microphones and other equipment, such as keyboards, to analog inputs 3–8. Each combo connector allows connection of either an XLR plug or a ¼" TS / TRS plug. | XLR/TRS Combo Inputs 3–8 |
| Connect your monitor speakers to the Monitor Outputs 1–2 on the rear of the device. | Monitor Outputs 1–2 |
| Connect your headphones to headphone output 1 or 2. | Headphone Outputs |
| Connect ADAT or S/PDIF digital audio gear. | Optical I/O |
ADAT expansion with multiple Volt 876 units
You can expand your system to 16 or 24 analog preamp channels using ADAT expansion mode. ADAT expansion mode allows you to route 16 or 24 analog input channels (at 44.1 kHz / 48 kHz sample rate) in UAD Console, using two or three Volt 876 interfaces. In this scenario, one Volt 876 is configured as the USB interface, and the other Volt 876 units are configured as ADAT expander units in UAD Console settings.
See ADAT expansion with multiple Volt 876 interfaces for more information.
Volt 876 Front Panel Descriptions (Left Side)
(1) Talkback Mic
The built-in talkback mic is located inside of this hole. Talkback functions are configured in UAD Console software and can be activated with the DIM / TALK front panel button (14) or in UAD Console.
Caution: The talkback microphone is sensitive. To avoid equipment damage, do not insert any object into the mic hole, apply pressurized air into the mic hole, or use a vacuum over the mic hole.
(2) XLR/TRS Combo Inputs 1–2
Connect your microphones, Hi-Z instruments, or line sources here. The combo input jacks accept XLR and ¼” (6.35 mm) plugs.
A microphone is typically connected with an XLR connector, and an instrument or line level signal is typically connected with a ¼” (6.35 mm) TS (tip-sleeve) or TRS (tip-ring-sleeve) plug.
Preamp gain range and input impedance automatically adjusts for mic, line, and instrument signals, based on whether the plug is XLR or ¼”, along with the state of the INST button.
Press the INST button (7) to toggle the impedance and gain range of the line input to accommodate a Hi-Z instrument, such as an electric guitar or bass.
Tip: The Vintage Preamp and 76 Compressor can be used on all mic, line, and instrument inputs.
Balanced and unbalanced connections
- All Volt 876 line inputs are balanced when connected with TRS or XLR cables to balanced equipment. All line inputs are unbalanced when connected with TS cables, or when connected to unbalanced equipment.
- Use TRS (balanced) audio cables for the best results with balanced audio sources. Balanced equipment uses three conductor wiring (via TRS or XLR connectors) to reduce interference and electrical noise, and to provide better audio quality over longer cable runs. Use TS (unbalanced) cables for instruments that are not balanced, such as an electric guitar or bass, or an unbalanced keyboard. TS connections may also be suitable for shorter input cables, where electrical interference noise may not be an issue.
(3) Channel Select 1-8
Press a channel select button to focus that channel and adjust settings for that particular input. When a channel is selected, its button is lit orange and the channel's controls for gain, Instrument (channels 1-2 only), 48V phantom power, polarity, 76 Compressor, and Vintage Preamp apply only to the selected channel(s). Direct monitoring settings also apply only to selected channels.
To link two channels for stereo operation, press and hold both buttons until they are illuminated. To unlink two channels, press and hold both buttons until the buttons are unlit.
Note that only odd-even channel pairs can be linked (for example, 3-4 can be linked, but 4-5 cannot).
(4) Gain Knob
This knob adjusts the preamp gain for the microphone, instrument or line-level device connected to the selected input or input pair.
For optimum gain, rotate the knob to adjust the input signal level while monitoring the source that is connected, so the input meter (10) shows signal but does not light red. The red input LED lights when the input signal is near 0 dBFS (digital clipping).
Tips
- Digital clipping occurs when the input is overloaded. With digital clipping, the top of the waveform is squared off, creating distortion that may be unpleasant. Digital clipping has creative uses, but is usually avoided. To prevent digital clipping, adjust the gain so only green and yellow meters light, and the red LED doesn't light.
- You can automatically set gain levels with Assistive Auto-Gain in UAD Console.
(5) 48V Phantom Power Button
Press this button to toggle 48V phantom power for the selected XLR microphone input or input pair. The LED blinks red briefly while phantom power is activating or powering off. The LED is lit solid red when phantom power is active.
Phantom power is required by most condenser microphones, but is usually not required with dynamic microphones or ribbon microphones (and phantom power can damage some ribbon microphones).
Note: Disable phantom power before you connect or disconnect a microphone.
(6) Polarity button
Press this button to invert the polarity ("phase") of the selected input or input pair. The polarity button is lit orange when polarity is inverted. Polarity inversion can help reduce phase cancellations when more than one microphone is used to record a single source.
(7) Instrument Button (INST)
Press this button to toggle the impedance and gain of input 1 or 2 to accommodate Hi-Z instruments, such as electric guitar or bass. This button is lit green when Hi-Z input is enabled.
Note: When the INST button is engaged, 48V phantom power is disabled (phantom power is not available on the ¼" jacks).
Tip: Generally speaking, the INST button should be off when connecting a line-level source such as a keyboard or sound module, unless you need more gain.
(8) Vintage Button
Press this button to toggle Vintage mode for the selected preamp channel. The Vintage setting can be used on mic, line, and instrument inputs. When active, this button is lit orange.
Vintage adds a carefully crafted analog tube preamp emulation, inspired by Universal Audio’s all-tube 610 console preamplifier, for a richer sound.
(9) 76 Compressor Button
Press this button to engage the 76 Compressor for the selected channel or pair. The 76 Compressor can be used on mic, line, and instrument inputs. When active, this button is lit orange.
The 76 Compressor lets you add clarity and punch to voice, guitars, and more, with an analog compressor based on UA's iconic 1176 Limiting Amplifier.
Press the button repeatedly to cycle through the presets (VOC, GTR, or FAST) and disable the circuit.
Note: The input level increases when the compressor is active, so you may want to decrease your Gain amount.
(10) 76 Compressor Presets
The indicators above the 76 Compressor button indicate whether the compressor is off (LED unlit) or enabled on one of the presets. The 76 Compressor presets have the following characteristics:
| FAST | Fastest attack and fast release for aggressive compression |
| GTR | Medium attack and very slow release allows guitar/bass transients and longer sustain |
| VOC | Slowest attack and slow release for classic smooth vocal compression |
Tip: Although these presets are designed to work well with these particular sources, you can use any setting with any source. Feel free to use the 76 Compressor creatively.
Volt 876 Front Panel Descriptions (Right Side)
(11) Level Meter
The meter display shows the levels for the selected metering mode. You can change the metering mode by pressing the Meter button (12). The meter indicates levels as indicated in this table.
| Meter label | Signal Level | LED Color |
| -27 | -38 dB to -27 dB | Green |
| -18 | -27 dB to -9 dB | Green |
| -9 | -9 dB to -3 dB | Green |
| -3 | -3 dB to 0 dB | Yellow |
| C | Above 0 dBFS (digital clipping) | Red |
(12) Meter Switch
Cycle through the available meter modes with this switch.
| Meter Switch LEDs | Meter Display |
| IN | Analog inputs 1–8 |
| OUT | Analog outputs 1–8 |
| OPT 1 + IN | Optical inputs 1–8 |
| OPT 1 + OUT | Optical outputs 1–8 |
| OPT 2 + IN | Optical inputs 9–16 |
| OPT 2 + OUT | Optical outputs 9-16 |
(13) Direct Monitoring Button
Press this button to enable direct monitoring for the channel or channel pair. Direct monitoring is on when the button is lit green, and off when the button is unlit.
Important: Direct monitoring applies to the input signals only. You always hear audio from your computer or audio software regardless of this setting.
When the button is lit green, the selected input is being monitored directly through the UAD Console mixer or to the stereo outputs (if you aren't using UAD Console).
When you enable direct monitoring on a channel, the channel is unmuted in UAD Console. When the channel is not direct monitored, it is muted in UAD Console.
Tip: The Mute button in UAD Console also toggles direct monitoring on and off.
Direct monitoring notes
When direct monitoring is on, disable the software monitoring feature in your audio software to prevent signal doubling, which can make your input sound thin or “phasey.” When enabled, direct monitor levels, panning, and Cue sends can be controlled in UAD Console. See the UAD Console for Volt 876 Manual for more information.
When direct monitoring is off, you may notice your inputs have latency (a slight delay) before they are heard, as a result of buffering and signal processing by your DAW.
Note: When one or more channels are soloed in UAD Console, direct monitored signals on other channels are not heard.
What is direct monitoring?
Use direct monitoring on Volt 876 to hear your input signals without latency in your headphones and monitor speakers.
With direct monitoring, you hear the input signals directly from the Volt 876 hardware with no latency, bypassing your audio software’s buffers.
When you monitor input signals through your audio software's mixer (software monitoring), those signals pass through the software before you hear them from the Volt 876 monitor and headphone outputs. These signals use the software buffer, which causes latency — an amount of delay that increases as the buffer size is increased.
Use direct monitoring when you are recording sources that you don’t need to monitor through your software. For example, use direct monitoring when recording vocals or instruments without effects or plug-ins from your software.
(14) Dim / Talk Button
The Dim / Talk button activates the built-in talkback microphone and reduces (dims) the level of your monitor output signals by 20 dB. Dim / Talk is typically used to temporarily reduce the listening volume in the control room while communicating with performers via Cues.
Press and release the button quickly to latch or disengage talkback. To momentarily activate talkback and dim, and deactivate when the button is released, press and hold the button for longer than 0.5 seconds. The Dim / Talk button is lit yellow when the feature is active.
(15) Alt Button
The Alt button routes the main mix to outputs 3-4 when active, for monitoring on a secondary pair of speakers.
To prevent ALT being accidentally enabled or disabled, you enable ALT monitoring with a two-step process.
- Press and hold the ALT button until the button flashes (approximately 2 seconds).
Volt 876 is now in Alt Monitor mode and any signals that were routed to outputs 3-4 are no longer routed to those outputs. - When in Alt Monitor mode, press the ALT button once to toggle signal to the Alt outputs. When the ALT button is lit, the main mix is now routed to outputs 3-4 instead of the Monitor L/R outputs. When the button is unlit (toggled off) the main mix is again routed to the Monitor L/R outputs, and no signal is sent to outputs 3-4.
To exit ALT mode, press and hold the ALT button again until the button flashes (approximately 2 seconds). Any channels previously routed to outputs 3-4 are now restored.
(16) Mute Button
The Mute button toggles muting of outputs 1-2 or outputs 3-4 (if ALT is active) when engaged. The button is lit red when the signal is muted.
(17) Monitor Level Knob
Rotate this knob to adjust the volume of speakers connected to the Monitor outputs. The ring LEDs around the knob indicate the monitor volume setting.
(18) Headphone Volume Knobs
Adjust the volumes at the headphone outputs (19) with these knobs. The headphone volume controls are independent from the Monitor volume control.
Note: The monitor output and headphone signals are the same by default, but the headphone outputs can be configured to hear independent cue mixes in UAD Console.
(19) Headphone Outputs
Connect stereo headphones to these outputs. Headphones are connected with a ¼” (6.35 mm) TRS plug. If your headphones have a ⅛” (3.5 mm) plug, use a TRS ⅛” to ¼” adapter.
(20) Clock Button (ADAT mode only)
In ADAT mode only, press the clock button to switch the clock source between the internal clock (INT), ADAT optical (OPT), or BNC word clock (WORD). When not in ADAT mode, you can adjust the clock source in UAD Console. The label is lit yellow for the selected clock source. If the selected clock source is not resolved, the label blinks.
Clock source switches automatically when certain clock sources are available, as follows.
- The default clock source is INT
- When a valid optical (ADAT or S/PDIF) clock is detected, the clock source switches to OPT
- When a valid BNC word clock is detected, the clock source switches to WORD
- When both BNC word clock and S/PDIF or ADAT optical clock is detected, the clock source switches to OPT
(21) Rate Button (ADAT mode only)
Cycle through the available sample rates with this button. When not in ADAT mode, you can adjust the sample rate in UAD Console. The active sample rate is indicated when its label is lit yellow. Sample rate indicators do not include the decimal place, so for example, 44.1 is listed as 44.
Available sample rates:
- 44.1 kHz
- 48 kHz
- 88.2 kHz
- 96 kHz
- 176.4 kHz
- 192 kHz
(22) Mode
USB mode is the standard audio interface mode, which allows you to route up to 24 analog and digital inputs through your interface. ADAT mode reconfigures the unit as a standalone mic preamp and A/D - D/A converter, or for use in an ADAT expansion system.
Note: Changing the active mode causes a complete reconfiguration of inputs and outputs. To prevent the mode from being changed accidentally, you switch modes with a three-step process:
- Press and hold the Mode button for two seconds until the MODE indicator flashes.
- Short-press this button to cycle through the available modes.
- When you reach the mode you want to use, press and hold the button again until the mode indicator no longer flashes.
Note that the HOST indicator LED is lit yellow when a USB connection to the host computer is active, regardless of the mode.
For complete details about this feature, see Mode below.
(23) Power Button
Apply AC power to Volt with this button.
Volt 876 Rear Panel Descriptions (Right Side)
(24) XLR/TRS Combo Inputs 3–8
Connect your microphones or line level sources here. The combo input connectors accept XLR and ¼” (6.35 mm) plugs. These inputs function similarly to inputs 1–2 on the front panel, except the Hi-Z Instrument Button (INST) does not apply to these inputs.
See (2) XLR/TRS Combo Inputs 1–2 for information on these connections.
About Line Outputs 1-8
Outputs 1-8 are ¼” (6.35mm) jacks that can be connected to the inputs of other audio gear. You can use TS (tip-sleeve) or TRS (tip-ring-sleeve) cables for any of these outputs.
You can route signals to these outputs with your DAW software. By default, your DAW sends the main stereo monitor mix to outputs 1/L and 2/R.
Note: The signals at monitor 1-2 and ALT 3-4 outputs are line level and unpowered. Connect these outputs to either powered speakers or an amp with speakers.
Balanced and unbalanced connections
All Volt 876 line outputs are balanced when connected with TRS or XLR cables to balanced equipment. All line outputs are unbalanced when connected with TS cables, or when connected to unbalanced equipment.
Use TRS (balanced) audio cables for the best results with balanced audio sources. Balanced equipment uses three conductor wiring (via TRS or XLR connectors) to reduce interference and electrical noise, and to provide better audio quality over longer cable runs. Use TS (unbalanced) cables for instruments that are not balanced, such as an electric guitar or bass, or an unbalanced keyboard. TS connections may also be suitable for shorter cables, where electrical interference noise may not be an issue.
(25) Monitor Outputs 1–2
Connect your stereo speaker system to the monitor outputs. Connect the left speaker to Monitor 1/L and the right speaker to Monitor 2/R. Your main mix output is routed to these speakers when the ALT button is not engaged.
Note: There is no MONO switch on the Volt 876 hardware. If the MONO switch in UAD Console is engaged and Volt 876 is then disconnected from the host computer, the monitor output will remain monophonic until Volt 876 is reconnected to the host computer and the setting is disengaged in UAD Console.
(26) Line Outputs 3–4 / ALT Outputs
You can connect your alternate monitoring speakers and send the stereo monitor output to these speakers when ALT monitoring is enabled, and the ALT button is engaged. Connect the left alternate speaker to 3 and the right alternate speaker to 4.
(27) Line Outputs 5–8
Line outputs 5-8 are identical to outputs 1-4, except they are not used for main or alt monitoring.
Volt 876 Rear Panel Descriptions (Left Side)
(28) Optical I/O
These TOSLINK ports use the ADAT Lightpipe Optical Interface protocol for interconnecting with other digital audio hardware devices. Two ADAT inputs and two ADAT outputs are provided, for up to sixteen channels of ADAT digital audio, or two channels of S/PDIF audio.
Note: Volt 876 supports ADAT or S/PDIF format digital audio. You can select the digital audio format within UAD Console Settings.
ADAT format digital audio
An overview of the available digital audio channels is provided in the table below.
| Optical Format | Sample Rate (kHz) | Optical IN 1 | Optical OUT 1 | Optical IN 2 | Optical OUT 2 |
| S/PDIF | 44.1, 48 |
Two channels S/PDIF L/R |
Two channels S/PDIF L/R |
Disabled |
Two channels S/PDIF L/R (mirrored) |
| 88.2, 96 | |||||
| 176.4, 192 | |||||
| ADAT | 44.1, 48 |
Eight channels ADAT 1–8 |
Eight channels ADAT 1–8 |
Eight channels ADAT 9–16 |
Eight channels ADAT 9–16 |
| 88.2, 96 (S/MUX) |
Four channels ADAT 1–4 |
Four channels ADAT 1–4 |
Four channels ADAT 5–8 |
Four channels ADAT 5–8 |
|
| 176.4, 192 (S/MUX) |
Two channels ADAT 1–2 |
Two channels ADAT 1–2 |
Two channels ADAT 3–4 |
Two channels ADAT 3–4 |
Digital audio channels and sample rates
Available ADAT channels depend on the current system sample rate.
At sample rates of 44.1 kHz and 48 kHz, the original ADAT protocol is used, and eight audio channels are routed per optical port. At higher sample rates, the industry standard ADAT S/MUX protocol is used to maintain high-resolution transfers.
Important: To use all available ADAT channels with the optical ports at sample rates of 88.2 kHz and higher, optical ports 1 and 2 must both be connected to the other device, and the other device must also support the ADAT S/MUX protocol.
The following behaviors apply to the optical ports with ADAT:
- At sample rates of 44.1 kHz and 48 kHz, ports 1 and 2 each support eight audio channels
- At sample rates of 88.2 kHz and 96 kHz, up to four channels of audio are routed per port (eight channels total, when both ports are used)
- At sample rates of 176.4 kHz and 192 kHz, up to two channels of audio are routed per port (four channels total, when both ports are used)
S/PDIF format digital audio
Volt 876 supports two channels of digital S/PDIF I/O at sample rates of 44.1 kHz to 192 kHz. In S/PDIF mode:
- Optical IN 1 is active (S/PDIF 1–2 in UAD Console)
- Optical IN 2 is disabled
- Optical OUT 1 and OUT 2 are active, and the S/PDIF signal is duplicated on both output ports (S/PDIF 1–2 in UAD Console)
(29) MIDI I/0
You can connect a MIDI device to Volt 876 with standard 5-pin MIDI DIN cables. Connect the MIDI OUT of your device to the MIDI IN on Volt 876, and the MIDI IN of the device to the MIDI OUT on Volt 876.
You may not need to make both connections. For example, a MIDI controller might only be connected to the MIDI IN on Volt 876, and a MIDI sound module might only be connected to the MIDI OUT from Volt 876.
Tip: MIDI I/O remains functional when Volt 876 is in ADAT mode, when connected to the computer via USB.
(30) Word Clock I/O
Word Clock In
Volt 876's internal clock can be synchronized to follow an external word clock. You can set the clock source to Word from the front panel or within UAD Console, connecting the external word clock’s BNC connector to Volt 876’s word clock input, and setting the external device to transmit word clock.
When Volt 876 uses external word clock as the clock source, Volt 876 is a word clock follower.
Notes
- Important: Volt 876’s sample rate must be manually set to match the incoming clock’s sample rate.
- If Volt 876 is the last device in the clock chain, engage the Termination switch (31).
- Volt 876 can be synchronized to an external “1x” clock signal only. Superclock, overclocking, and subclocking are not available.
Word Clock Out
This BNC connector transmits a standard (1x) word clock in any Clock mode. The clock rate sent by this port matches the current system sample rate, as specified within UAD Console.
In Word Clock mode, Word Clock Out mirrors Word Clock In.
(31) 75 Ohm Word Clock Termination Switch
This switch provides internal 75-ohm word clock input signal termination when required. Word clock termination is active when the switch is engaged (depressed). Volt 876's termination switch should only be engaged when Volt 876 is set to sync to external word clock and it is the last device at the receiving end of a word clock cable. For example, if the device is the last follower unit at the end of a clock chain (when Volt 876’s word clock OUT port is not used), termination should be active.
(32) USB-C
Connect Volt 876 to a USB 2.0 (or higher) port on your computer with the included USB-C cable. The computer port can be USB-C or USB-A, and any USB 2.0 or higher data cable can be used.
For iOS and iPad devices, connect Volt 876 with a USB-C cable (devices with USB-C ports) or with the Apple Lightning to USB Camera Adapter (devices with Lightning ports).
(33) IEC Power Input
Connect the included IEC power cord here. Use the Power switch on the front panel to power the unit on and off.
Mode
You can switch Volt 876 between USB interface mode and ADAT mode from the Volt 876 Mode hardware button (22) or UAD Console. The two modes are completely different configurations of Volt 876 inputs and outputs. USB mode is the standard audio interface mode, which allows you to route up to 24 analog and digital inputs through your interface. ADAT mode reconfigures the unit as a standalone mic preamp and A/D - D/A converter, or for use in an ADAT expansion system.
Active MIDI ports
On any Volt 876 that is connected via USB, the MIDI ports remain active. This includes both USB and ADAT modes, in any configuration.
Note: On macOS, Volt 876 appears as two different MIDI devices depending on whether the unit is in USB mode or ADAT mode. When configuring the device in Audio MIDI Setup, make sure to use the Volt 876 device that is currently active. To distinguish between the devices in Audio MIDI Setup, you can double-click each Volt 876 MIDI device and give it a unique name.
USB mode
USB mode is the default configuration for Volt 876. In USB mode, analog inputs and digital outputs are unlinked, and can be routed independently using UAD Console and/or your DAW. USB mode is also the mode for the control unit in an ADAT expansion system.
USB interface mode sample rates and I/O
| Sample Rate (kHz) | Analog I/O | ADAT Digital I/O |
| 44.1, 48 | 8 x 8 | 16 x 16 |
| 88.2, 96 | 8 x 8 | 8 x 8 |
| 176.4, 192 | 8 x 8 | 4 x 4 |
ADAT mode
ADAT mode has two possible states:
- ADAT standalone mode
- ADAT expansion mode
ADAT standalone mode
ADAT standalone mode is the default mode when you switch a Volt 876 unit to ADAT mode. In this mode:
- Volt 876 functions as a standalone mic preamp and A/D - D/A converter
- Analog inputs 1-8 are routed directly to corresponding ADAT outputs 1-8
- ADAT inputs 1-8 are routed directly to corresponding analog outputs 1-8
- Audio is not routed to the computer (there is no audio in UAD Console)
- Volt 876 does not appear as a Core Audio or ASIO device
- Loopback is disabled
ADAT standalone mode with computer control
In ADAT standalone mode, when Volt 876 is connected to your computer via USB, the following settings can be controlled within UAD Console:
- Preamp settings
- Sample rate
- Clock source
- USB or ADAT mode
ADAT expansion mode
In ADAT mode you can configure the Volt 876 as an expander unit. In this mode, two or three Volt 876 units can be combined to provide control within UAD Console of up to 24 preamp inputs. See ADAT expansion with multiple Volt 876 interfaces for more information.
ADAT Expansion with Multiple Volt 876 Interfaces
You can expand your Volt 876 system to include two or three Volt 876 interfaces for 16 or 24 analog inputs (at 44.1 kHz and 48 kHz). In this configuration, one Volt 876 is set as the USB interface unit, and the other Volt 876 units are set as ADAT expander units.
Important: ADAT expansion mode requires two or more Volt 876 units connected to your computer via USB and to each other via optical cables. ADAT expansion mode also requires the UAD Console app. ADAT expansion mode cannot be configured using Volt 876 hardware buttons.
In this configuration, the ADAT outputs from the ADAT expander units are connected to the ADAT inputs on the USB interface unit, and vice versa.
Each Volt 876 must also be connected separately to the host computer via USB. You can then control all analog preamp settings for the ADAT expander units within UAD Console, and all audio from the expander units is available in the UAD console monitor and cue mixes.
Caution: To prevent feedback, before you switch a device between USB mode and ADAT mode, make sure all microphones are muted.
ADAT Expansion and sample rates
For sample rates higher than 48 kHz, the maximum number of expander channels is eight, and only one expander unit is supported.
| Sample rate | Available preamp channels | Expander units |
| 44.1 kHz / 48 kHz |
8 (one expander unit) 16 (two expander units) |
One or two |
| 88.2 kHz / 96 kHz | 8 | One |
| 176.4 kHz / 192 kHz | 4 | One |
Cabling Volt 876 hardware for ADAT expansion (44.1 kHz / 48 kHz)
- Power off all Volt 876 hardware units.
- Connect the ADAT expander units to the USB interface unit via optical cables, as shown in the image and table below.
- Connect the USB interface unit and ADAT expander units to the computer via USB. You can use a USB hub to make these connections.
- After making the connections, power on the Volt 876 hardware units.
Optical & USB Connections for Volt 876 ADAT expansion (44.1 kHz / 48 kHz) 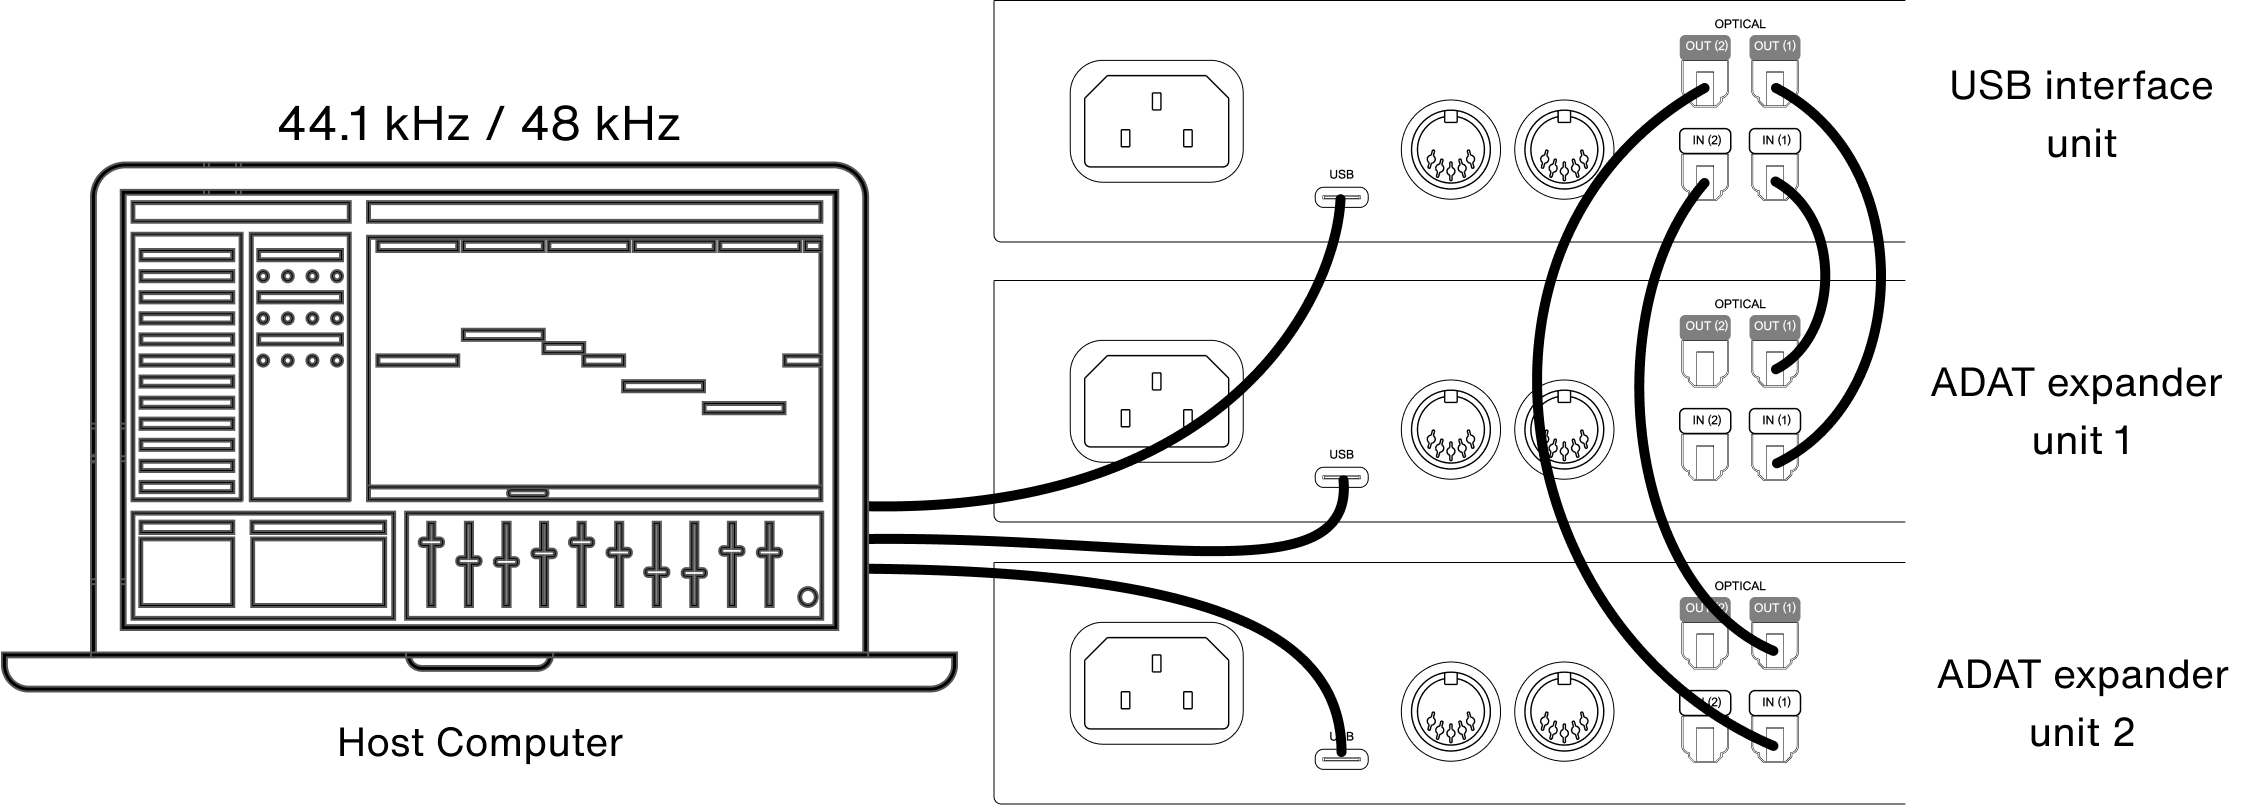
| USB interface unit | ADAT expander unit 1 | ADAT expander unit 2 |
| Optical In 1 | Optical Out 1 | |
| Optical In 2 | Optical Out 1 | |
| Optical Out 1 | Optical In 1 | |
| Optical Out 2 | Optical In 1 |
Cabling Volt 876 hardware for ADAT expansion (88.2 kHz – 192 kHz)
- Power off all Volt 876 hardware units.
- Connect the ADAT expander unit to the USB interface unit via optical cables, as shown in the image and table below.
- Connect the USB interface unit and ADAT expander unit to the computer via USB. You can use a USB hub to make these connections.
- After making the connections, power on the Volt 876 hardware units.
Optical & USB Connections for Volt 876 ADAT expansion (88.2 kHz – 192 kHz)
| USB interface unit | ADAT expander unit |
| Optical In 1 | Optical Out 1 |
| Optical In 2 | Optical Out 2 |
| Optical Out 1 | Optical In 1 |
| Optical Out 2 | Optical In 2 |
ADAT Expansion with Other Digital Gear
You can expand your Volt 876 system to include one or two other ADAT or S/PDIF digital devices (including non-Volt interfaces), to expand your inputs to as many as 24 inputs (at 44.1 kHz and 48 kHz). In this configuration, you route the digital optical outputs of other devices into the Volt 876 digital optical inputs. The audio channels appear in UAD Console, routed through the ADAT channels.
- Input levels: There is no adjustment available in UAD Console for digital input levels from non-Volt devices. You must set the levels on your digital outboard gear.
- Clocking: If your gear is connected only from outputs to the inputs via the TOSLINK connections, the outboard gear must be the digital clock source, so you should set the clock source in UAD Console to ADAT.
Example connections for digital outboard gear with Volt 876
Cabling Volt 876 hardware for ADAT expansion with digital outboard gear
- Power off all hardware units.
- Connect the ADAT expander units to the Volt 876 via optical cables, as shown in the image above.
- Connect the Volt 876 interface to the computer via USB.
- After making the connections, power on all hardware units.
ADAT or S/PDIF inputs appear in UAD Console. You can assign these tracks to Cue mixes, and adjust monitor mix levels, solo, and mute. You cannot adjust input levels for external digital gear inputs. You must make those adjustments on the gear. ADAT or S/PDIF channel availability depends on the system sample rate. See Digital audio channels and sample rates for details.
Troubleshooting Volt 876
| Issue | Solution |
| No power |
Make sure the IEC power cable is connected and the wall socket has power. Volt 876 cannot be bus powered over USB. Make sure the power switch is in the ON position. |
| Unit is not recognized by computer |
Power Volt 876 off and back on. Try a different USB port or USB hub. Try a different USB data cable. Power off computer and Volt 876, then restart computer and Volt 876. |
|
No sound
|
Confirm connections, power, and volume of monitoring system. Confirm Volt monitor level is turned up. Confirm monitor outputs are not muted in UAD Console. Confirm monitor LEDs are active (check signal flows). Confirm monitor source is set to Monitor, or if set to a cue mix, that audio is routed to the Cue mix. |
| No audio from preamp inputs |
Confirm Direct button is enabled for channel (channel is not muted in UAD Console). Check cable connection. If using a condenser mic that requires phantom power, make sure phantom power is enabled for the channel. Confirm preamp gain is turned up for the channel(s). |
| No sound when pressing Direct button |
Confirm that no channels are soloed in UAD Console (there is no solo indicator on Volt 876 hardware). Confirm that the headphones are properly connected, and headphone level is turned up. If headphone is assigned to a Cue mix, confirm that Cue level is turned up for the channel in UAD Console. |
| Preamp controls don't affect channel | Confirm that the correct input is selected with the Channel Select button. |
| Phasey, thin, or echoing audio in your DAW |
Phasey or echoing audio can occur when you monitor a channel directly and through your DAW's input channel at the same time. When monitoring directly through Volt hardware / UAD Console, make sure to mute the channel in your DAW or disable software input monitoring. If software monitoring audio through your DAW, disable Direct monitoring for the channel or mute the channel in UAD Console. |
| Crackling audio, dropouts, glitches | Increase the buffer size setting in the software on your computer. When recording, you can use direct monitoring to record without latency at higher buffer sizes. |
| (PC) ASIO driver not available in DAW |
Install the Volt hardware driver with the UA Connect app.
|
| Device is behaving unexpectedly | Reset the device using the procedure below. |
Reset your Volt 876 to the factory default configuration
To reset your Volt 876 to factory defaults:
- Power off the Volt 876 hardware.
- Press and hold the INST 1/2 and Polarity buttons and power the Volt 876.
- Continue holding the INST 1/2 and Polarity buttons until the Channel Select button LEDs flash four times, then release.
The Volt 876 restarts in the factory default configuration.
Volt 876 Specifications
Notes
- All Monitor, Headphone, and Line outputs are DC coupled. All inputs are AC coupled.
- Specifications are subject to change without notice.
- Specifications for Volt desktop models are available here.
| SYSTEM | |
| I/O Complement | |
| Microphone/Line/Instrument Preamp Inputs | Two combo XLR/TRS |
| Microphone/Line Preamp Inputs | Six combo XLR/TRS |
| Line Outputs | Eight (including monitor outputs) |
| Monitor Outputs (selectable MON or ALT) | Line outputs 1-2 or 3-4 |
| Headphone Outputs | Two stereo |
| USB | One USB 2.0 port (USB Type-C connector) |
| MIDI | In, out (two 5-pin female DIN connectors) |
| A/D – D/A Conversion | |
| Supported Sample Rates (kHz) | 44.1, 48, 88.2, 96, 176.4, 192 |
| Bit Depth Per Sample | 32 |
| Simultaneous A/D Conversion | Eight channels |
| Simultaneous D/A Conversion | 12 channels (8 main, 2 stereo headphone) |
| ANALOG I/O | |
| Mic, Line, Instrument Inputs | |
| Available Gain | 60 dB |
| Vintage mode | Selectable per channel ON/OFF |
| 76 Compressor presets | Selectable per channel: VOC, GTR, FAST, OFF |
|
76 Compressor preset times VOC GTR FAST Compression Ratio |
(Attack and release times are approximate) Attack 2 ms / Release 300 ms Attack 1.5 ms / Release 700 ms Attack 30 µs / Release 35 ms 6:1 |
| Microphone Inputs | |
| Frequency Response | 20 Hz to 20 kHz, ±0.1 dB |
| Dynamic Range (A–weighted) | 116 dB |
| Total Harmonic Distortion + Noise (1 kHz @ -1 dBFS) | - 110 dB (0.0003 %) |
| Maximum Input Level | 14 dBu |
| Input Impedance | 2 Kilohms |
| Phantom Power | +48V (switchable per channel) |
| Connector Type | XLR Female, pin 2 positive |
| Instrument Inputs | |
| Frequency Response | 20 Hz to 20 kHz, ±0.03 dB |
| Dynamic Range (A–weighted) | 116 dB |
| Total Harmonic Distortion + Noise (1 kHz @ -1 dBFS) | -87 dB (0.004 %) |
| Maximum Input Level | 12.5 dBu |
| Input Impedance | 1 Megohms |
| Connector Type | ¼” TS unbalanced |
Line Inputs | |
| Frequency Response | 20 Hz to 20 kHz, ±0.05 dB |
| Dynamic Range (A–weighted) | 116 dB |
| Total Harmonic Distortion + Noise (1 kHz @ -1 dBFS) | -108 dB (0.0004 %) |
| Maximum Input Level | 22 dBu |
| Input Impedance | 10 Kilohms |
| Connector Type | ¼” TRS balanced or TS unbalanced |
| Monitor & Line Outputs (DC Coupled) | |
| Frequency Response | 20 Hz to 20 kHz, ±0.1 dB |
| Dynamic Range (A–weighted) | 119 dB |
| Total Harmonic Distortion + Noise (1 kHz @ -1 dBFS) | -111 dB (0.0002 %) |
| Maximum Output Level | 20.2 dBu |
| Output Impedance | 100 Ohms |
| Connector Type | ¼” TRS balanced or TS unbalanced |
| Alternate Monitor Outputs | Switchable to line outputs 3, 4 |
| Stereo Headphone Outputs (DC Coupled) | |
| Frequency Response | 20 Hz to 20 kHz, ±0.2 dB |
| Dynamic Range (300 Ohms, A–weighted) | 116 dB |
| THD + Noise (1 kHz @ -1 dBFS, 300 Ohms) | -108 dB (0.0004 %) |
|
Maximum Output Power into 32 Ohms Maximum Output Power into 300 Ohms Maximum Output Power into 600 Ohms |
225 mW per channel 65 mW per channel 35 mW per channel |
| Connector Type | ¼” TRS Stereo |
| DIGITAL I/O | |
| S/PDIF | |
| Connector Type | Optical TOSLINK JIS F05 (shared with ADAT 1) |
| Format | IEC 958 |
| Supported Sample Rates (kHz) | 44.1, 48, 88.2, 96, 176.4, 192 |
| ADAT | |
| Connector Type | Optical TOSLINK JIS F05 (two in, two out) |
| Format | ADAT Digital Lightpipe with S/MUX |
| Supported Sample Rates (kHz) | 44.1, 48, 88.2, 96, 176.4, 192 |
| Channel Assignments @ 44.1 kHz, 48 kHz | Port 1 = Channels 1 – 8, Port 2 = Channels 9 – 16 |
| Channel Assignments @ 88.2 kHz, 96 kHz | Port 1 = Channels 1 – 4, Port 2 = Channels 5 – 8 |
| Channel Assignments @ 176.4 kHz, 192 kHz | Port 1 = Channels 1 – 2, Port 2 = Channels 3 – 4 |
| Word Clock | |
| Connector Type | BNC |
| Word Clock Input Termination | 75 Ohms, switchable |
| Synchronization Sources | |
| Internal, Word Clock, ADAT, S/PDIF | |
| ELECTRICAL | |
| AC Input Connector Type | IEC C14 Male |
| AC Requirements | 100V – 240V AC, 50 – 60 Hz |
| Power Consumption | 35 W maximum |
| ENVIRONMENTAL | |
| Ambient Temperature Range | 32° to 104° F (0° to 40° C) |
| MECHANICAL | |
| Dimensions | |
| Chassis (including knobs) |
Width x Depth x Height (1RU) 17 x 13.1 x 1.7 in (43,2 x 33,3 x 4.32 cm) |
| Shipping Box |
Width x Depth x Height 21.5 x 17 x 5.5 in (54,6 x 43,2 x 14,0 cm) |
| Weight | |
| Shipping Weight (with box & accessories) | 14.2 lbs (6.44 kg) |
| Weight (bare unit) | 9.0 lbs (4.08 kg) |
| PACKAGE CONTENTS | |
| |
Volt 876 USB Driver Channels
| Volt 876 Driver Channels — 44.1 kHz & 48 kHz | |||
| Input | Name | Output | Name |
|
Input 1 Input 2 Input 3 Input 4 Input 5 Input 6 Input 7 Input 8 Input 9 Input 10 Input 11 Input 12 Input 13 Input 14 Input 15 Input 16 Input 17 Input 18 Input 19 Input 20 Input 21 Input 22 Input 23 Input 24 Input 25 Input 26 Input 27 Input 28 Input 29 Input 30 Input 31 Input 32 |
MIC/LINE/HI-Z 1 MIC/LINE/HI-Z 2 MIC/LINE 3 MIC/LINE 4 MIC/LINE 5 MIC/LINE 6 MIC/LINE 7 MIC/LINE 8 S/PDIF L S/PDIF R ADAT 1 ADAT 2 ADAT 3 ADAT 4 ADAT 5 ADAT 6 ADAT 7 ADAT 8 ADAT 9 ADAT 10 ADAT 11 ADAT 12 ADAT 13 ADAT 14 ADAT 15 ADAT 16 LOOPBACK L LOOPBACK R MONITOR L MONITOR R TALKBACK 1 TALKBACK 2 |
Output 1 Output 2 Output 3 Output 4 Output 5 Output 6 Output 7 Output 8 Output 9 Output 10 Output 11 Output 12 Output 13 Output 14 Output 15 Output 16 Output 17 Output 18 Output 19 Output 20 Output 21 Output 22 Output 23 Output 24 Output 25 Output 26 Output 27 Output 28 Output 29 Output 30 Output 31 Output 32 |
MON L MON R LINE 3 LINE 4 LINE 5 LINE 6 LINE 7 LINE 8 S/PDIF L S/PDIF R ADAT 1 ADAT 2 ADAT 3 ADAT 4 ADAT 5 ADAT 6 ADAT 7 ADAT 8 ADAT 9 ADAT 10 ADAT 11 ADAT 12 ADAT 13 ADAT 14 ADAT 15 ADAT 16 LOOPBACK L LOOPBACK R CUE1 L CUE1 R CUE2 L CUE2 R |
| Volt 876 Driver Channels — 88.2.1 kHz & 96 kHz | |||
| Input | Name | Output | Name |
|
Input 1 Input 2 Input 3 Input 4 Input 5 Input 6 Input 7 Input 8 Input 9 Input 10 Input 11 Input 12 Input 13 Input 14 Input 15 Input 16 Input 17 Input 18 Input 19 Input 20 Input 21 Input 22 Input 23 Input 24 |
MIC/LINE/HI-Z 1 MIC/LINE/HI-Z 2 MIC/LINE 3 MIC/LINE 4 MIC/LINE 5 MIC/LINE 6 MIC/LINE 7 MIC/LINE 8 S/PDIF L S/PDIF R ADAT 1 ADAT 2 ADAT 3 ADAT 4 ADAT 5 ADAT 6 ADAT 7 ADAT 8 LOOPBACK L LOOPBACK R MONITOR L MONITOR R TALKBACK 1 TALKBACK 2 |
Output 1 Output 2 Output 3 Output 4 Output 5 Output 6 Output 7 Output 8 Output 9 Output 10 Output 11 Output 12 Output 13 Output 14 Output 15 Output 16 Output 17 Output 18 Output 19 Output 20 Output 21 Output 22 Output 23 Output 24 |
MON L MON R LINE 3 LINE 4 LINE 5 LINE 6 LINE 7 LINE 8 S/PDIF L S/PDIF R ADAT 1 ADAT 2 ADAT 3 ADAT 4 ADAT 5 ADAT 6 ADAT 7 ADAT 8 LOOPBACK L LOOPBACK R CUE1 L CUE1 R CUE2 L CUE2 R |
| Volt 876 Driver Channels — 176.4 kHz & 192 kHz | |||
| Input | Name | Output | Name |
|
Input 1 Input 2 Input 3 Input 4 Input 5 Input 6 Input 7 Input 8 Input 9 Input 10 Input 11 Input 12 Input 13 Input 14 Input 15 Input 16 Input 17 Input 18 Input 19 Input 20 |
MIC/LINE/HI-Z 1 MIC/LINE/HI-Z 2 MIC/LINE 3 MIC/LINE 4 MIC/LINE 5 MIC/LINE 6 MIC/LINE 7 MIC/LINE 8 S/PDIF L S/PDIF R ADAT 1 ADAT 2 ADAT 3 ADAT 4 LOOPBACK L LOOPBACK R MONITOR L MONITOR R TALKBACK 1 TALKBACK 2 |
Output 1 Output 2 Output 3 Output 4 Output 5 Output 6 Output 7 Output 8 Output 9 Output 10 Output 11 Output 12 Output 13 Output 14 Output 15 Output 16 Output 17 Output 18 Output 19 Output 20 |
MON L MON R LINE 3 LINE 4 LINE 5 LINE 6 LINE 7 LINE 8 S/PDIF L S/PDIF R ADAT 1 ADAT 2 ADAT 3 ADAT 4 LOOPBACK L LOOPBACK R CUE1 L CUE1 R CUE2 L CUE2 R |
Notices
Important Safety Instructions
- Read these safety instructions and the instruction manual of the product.
- Keep these safety instructions and the instruction manual of the product. Always include all instructions when providing the product to other parties.
- Heed all warnings.
- Follow all instructions.
- Do not use this apparatus near water.
- Only clean the product when it is not connected to the power supply system. Clean only with a dry cloth.
- Do not block any ventilation openings. Install in accordance with the manufacturer’s instructions.
- Do not install near any heat sources such as radiators, heat registers, stoves, or other apparatus (including amplifiers) that produce heat.
- Only operate the product from the type of power source indicated on the power supply unit.
- Protect the power cord from being walked on or pinched, particularly at plugs, convenience receptacles, and the point where it enters into and/or exits from the apparatus.
- Only use attachments/accessories specified by the manufacturer.
- Unplug this apparatus during lightning storms or when unused for long periods of time.
- Refer all servicing to qualified service personnel. Servicing is required when the apparatus has been damaged in any way, such as when the power supply cord or plug is damaged, liquid has been spilled into or objects have fallen into the apparatus, or when the apparatus has been exposed to rain or moisture, does not operate normally, or has been dropped.
- Warning: To reduce the risk of fire or electric shock, do not expose this apparatus to rain or moisture. Objects filled with liquids, such as vases, should not be placed on this apparatus.
- To completely disconnect this apparatus from the AC mains, disconnect the power supply cord plug from the AC receptacle.
- The mains plug of the power supply cord shall remain readily accessible.
- Do not attempt to open the product housing. The warranty is voided for products opened by the customer.
- Let the product reach ambient temperature before switching it on.
- Caution: High signal levels can damage your hearing and your loudspeakers. Reduce the volume on the connected audio devices before switching on the product; this will also help prevent acoustic feedback.
- Intended use. The product is designed for indoor use. The product can be used for commercial purposes. It is considered improper use when the product is used for any application not named in the corresponding instruction manual. Universal Audio does not accept liability for damage arising from improper use or misuse of this product and its attachments/ accessories. Before putting the product into operation, please observe the respective country-specific regulations.
Manufacturer’s Declarations
Warranty
The product is covered by a limited warranty. For the current terms of such warranty, please visit uaudio.com/eula.
Maintenance
- CAUTION: To reduce the risk of electric shock, do not open the unit.
- This product does not contain a fuse or any other user-replaceable parts. The unit is internally calibrated at the factory. No internal user adjustments are available.
Repair Service
If you are having trouble with your hardware, first check all system setups, connections, and operating instructions. If that doesn’t help, contact our technical support team.
To learn about repair service, or to contact UA Customer Care, visit help.uaudio.com.
Notes on Disposal
In compliance with the following requirements:
WEE-DIRECTIVE (2012/19/EU)
The symbol of the crossed-out wheeled bin on the product, the battery/rechargeable battery (if applicable), and/or the packaging indicates that these products must not be disposed of with normal household waste, but must be disposed of separately at the end of their operational lifetime. For packaging disposal, please observe the legal regulations on waste segregation applicable in your country.
Further information on the recycling of these products can be obtained from your municipal administration or from the municipal collection points. The separate collection of waste electrical and electronic equipment, batteries/rechargeable batteries (if applicable) and packaging, is used to promote the reuse and recycling and to prevent negative effects caused by e.g., potentially hazardous substances contained in these products. Herewith, you can make an important contribution to the protection of the environment and public health.
Class B Device Statements
United States
NOTE: This equipment has been tested and found to comply with the limits for a Class B digital device pursuant to Part 15 of the FCC Rules. These limits are designed to provide reasonable protection against harmful interference in a residential installation. This equipment generates, uses, and can radiate radio frequency energy and, if not installed and used in accordance with the instructions, may cause harmful interference to radio communications. However, there is no guarantee that interference will not occur in a particular installation. If this equipment does cause harmful interference to radio or television reception, which can be determined by turning the equipment off and on, the user is encouraged to try and correct the interference by one or more of the following measures:
- Reorient or relocate the receiving antenna.
- Increase the separation between the equipment and the receiver.
- Connect the equipment into an outlet on a circuit different from that to which the receiver is connected.
- Consult the dealer or an experienced radio/TV technician for help.
Any modifications to the unit, unless expressly approved by Universal Audio, could void the User’s authority to operate the equipment.
Compliance
This product complies with the following requirements:
Safety
- IEC 62368-1:2018
EMC Emissions
- 47 CFR Part 15 Subpart B
- 47 CFR Section 2.906
- CAN ICES-003(B)
- EN 55032:2015+A1:2020
- EN 61000-3-3:2013+A2:2021
- EN IEC 61000-3-2:2019+A2:2024
- FCC Part 15 Subpart B
- IEC CISPR 32:2015+A1:2019
- J55032(H29)
- KS C 9832
EMC Immunity
- EN 55035:2017+A11:2020
- KS C 9835
EU Directives
- RoHS 2 2011/65/EU
- RoHS 3 2015/863/EU
- REACH (EC) No 1907/2006
- WEEE 2012/19/EU
- EMC 2014/30/EU
KCC Declarations
- Applicant Name: Universal Audio, Inc.
- Equipment Name: USB Audio Interface
- Model Name: VOLT 876
- Certification Number: R-R-UAI-VOLT876
- Manufacturer: Universal Audio, Inc.
- Countries of Origin: Vietnam, China
- Date of Registration: 2025-08
End User License Agreement
Your rights to the Software are governed by the accompanying End User License Agreement, a copy of which can be found at www.uaudio.com/eula.
Copyrights & Trademarks
© 2025 Universal Audio, Inc. All rights reserved worldwide. The "Universal Audio" name, UA "diamond" logo, and "UA Volt" are trademarks or registered trademarks of Universal Audio, Inc. All other products and trademarks pictured herein are the property of their respective owners.
ASIO is a trademark and software of Steinberg Media Technologies GmbH.
Disclaimer
The information contained in this manual is subject to change without notice. Universal Audio, Inc. makes no warranties of any kind with regard to this manual, including, but not limited to, the implied warranties of merchantability and fitness for a particular purpose. Universal Audio, Inc. shall not be liable for errors contained herein or direct, indirect, special, incidental, or consequential damages in connection with the furnishing, performance, or use of this material.